Month: June 2010

Business of Software

Promise and Deliver

Under Promise and Over Deliver from NetworkPerformanceDaily.com
“They” say that you should under-promise and over-deliver. That seems to make good sense, doesn’t it? Why argue with conventional wisdom here? You set the client’s expectations really low and then you “WOW” them. How does that *NOT* make you look like a superhero?

The problem actually sets itself up several ways. First of all, it is extremely hard for your clients to manage their projects that way. If you set a time line of 3 weeks to finish 3 features and the client needs 10 features done in total, budgets are set to that effect and plans are made (including testing plans, marketing, etc) with the expectation that this project will take 10 weeks to finish development at this pace.

However, since you are an “over-deliverer”, you actually get 6 features done in those 3 weeks and the last 4 features done in another week and a half. So now we are less than halfway to the deadline and all the features are done and you even throw in “extra” features that had been cut due to your original estimates. What we are left with is a client with a finished product that they aren’t properly ready to market (remember those extra features?) and a TON of lag until launch day.

Let’s pretend that our situation isn’t even that dire. We can imagine that we had a simple project to do and we decide that we can do it in 3 days, but we pad our estimate to a full week since we love to under-promise. The truth is that we could really do it in 2 days and we do just that. We spend day number three testing the heck out of the thing and hand it over to the client. Their initial reaction might be that they are really surprised and happy.

That happiness might not be too long for this world, though. Your client might notice a pattern when working with you and decides to start pressing you for shorter estimates under the guise of urgency, but really it is because he doesn’t trust you any longer. You are either a terrible estimator, you cut a lot of corners, or you are a liar. Now when you really do need more time for something that is more complex than anticipated, the client fears that you are sandbagging and might make you commit to a deadline that you can’t make, further eroding that trust.

You can just avoid all of that hassle. Become familiar with your own throughput and velocity. Learn what you can and can’t do. Give up being a “superhero” (I know that one is hard, it is my Achilles heel). Learn the skill of Software Estimation and give good estimates and then… Back. Them. Up!

Occasionally, you will over-deliver and that is okay. Those are examples of when you have truly gone above and beyond. However, remember that you are far more valuable to your clients as someone who promises and delivers with such regularity that it is almost boring. You will be a superhero in comparison to others who are not as dedicated to the craft.

Windows Phone 7

Windows Phone 7 – Microphone and Isolated Storage

In my last Windows Phone 7 blog entry, we took a look at making a very simple Windows Phone 7 application. This time around, our goal is to make an app that uses the microphone on the phone and reads and writes to the phone’s isolated storage.

Let’s fire up Microsoft Visual Studio 2010 Express for Windows Phone and go File–>new Project–>Visual C#–>Silverlight for Windows Phone–>Windows Phone Application. Pick a Location for the Solution and name it SoundRecorder.
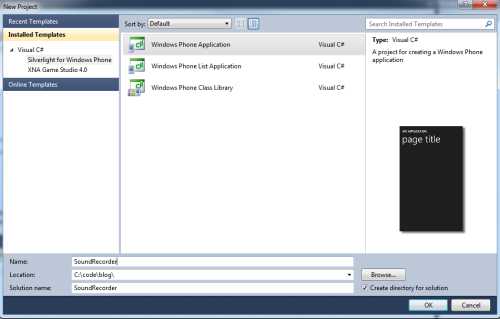
File New Project

The first thing we need to do after the project is created is to add a reference to Microsoft.Xna.Framework.dll. Right click on References in the Solution Explorer and select “Add Reference”. Find Microsoft.Xna.Framework.dll, select it, and click “Ok”. That will reference the Xna Framework (even though this is a Silverlight application) and give us easy access to the microphone.
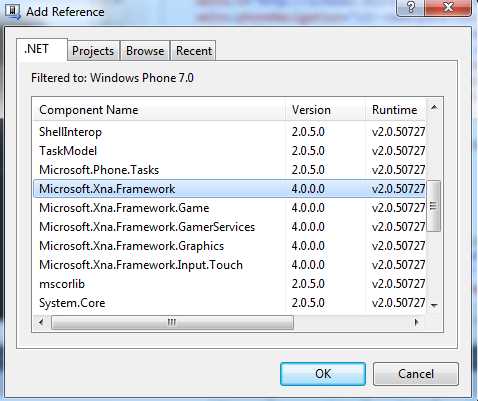
Adding the Microsoft.Xna.Framework reference

Now, let’s get our XAML set up. Type / copy-paste / set up the code you see below into MainPage.xaml. There isn’t much to see here besides three buttons (one of them disabled at the start) and our app’s title. Due to space constraints and the desire to be very “2.0”, I had to shorten the application name in the title to “Sound Recordr” from “Sound Recorder”.

<phoneNavigation:PhoneApplicationPage 
    x:Class="SoundRecorder.MainPage"
    xmlns="http://schemas.microsoft.com/winfx/2006/xaml/presentation"
    xmlns:x="http://schemas.microsoft.com/winfx/2006/xaml"
    xmlns:phoneNavigation="clr-namespace:Microsoft.Phone.Controls;assembly=Microsoft.Phone.Controls.Navigation"
    xmlns:d="http://schemas.microsoft.com/expression/blend/2008"
    xmlns:mc="http://schemas.openxmlformats.org/markup-compatibility/2006"
    mc:Ignorable="d" d:DesignWidth="480" d:DesignHeight="800"
    FontFamily="{StaticResource PhoneFontFamilyNormal}"
    FontSize="{StaticResource PhoneFontSizeNormal}"
    Foreground="{StaticResource PhoneForegroundBrush}">

    <Grid x:Name="LayoutRoot" Background="{StaticResource PhoneBackgroundBrush}">
        <Grid.RowDefinitions>
            <RowDefinition Height="Auto"/>
            <RowDefinition Height="*"/>
        </Grid.RowDefinitions>

        <Grid x:Name="TitleGrid" Grid.Row="0">
            <TextBlock Text="Pete on Software" x:Name="textBlockPageTitle" Style="{StaticResource PhoneTextPageTitle1Style}"/>
            <TextBlock Text="Sound Recordr" x:Name="textBlockListTitle" Style="{StaticResource PhoneTextPageTitle2Style}" Margin="6,43,0,0" />
        </Grid>

        <Grid x:Name="ContentGrid" Grid.Row="1">
            <Button Content="Start" Height="70" HorizontalAlignment="Left" Margin="165,55,0,0" Name="startButton" VerticalAlignment="Top" Width="160" Click="startButton_Click" />
            <Button Content="Stop" Height="70" HorizontalAlignment="Left" Margin="165,166,0,0" Name="stopButton" VerticalAlignment="Top" Width="160" Click="stopButton_Click" />
            <Button Content="Play Existing File" Height="70" HorizontalAlignment="Left" Margin="126,321,0,0" Name="playButton" VerticalAlignment="Top" Width="249" IsEnabled="False" Click="playButton_Click" />
        </Grid>
    </Grid>
    
</phoneNavigation:PhoneApplicationPage>

Now, in the code behind (MainPage.xaml.cs), we should have the following:

using System;
using System.IO;
using System.IO.IsolatedStorage;
using System.Windows;
using Microsoft.Phone.Controls;
using Microsoft.Xna.Framework.Audio;

namespace SoundRecorder
{
    public partial class MainPage : PhoneApplicationPage
    {
        private Microphone mic = Microphone.Default;
        private MemoryStream stream;
        private const string FILE_NAME = "recording.ps"; 
        byte[] buffer;
 
        public MainPage()
        {
            InitializeComponent();

            SupportedOrientations = SupportedPageOrientation.Portrait | SupportedPageOrientation.Landscape;

            // Some necessary setup for our Microsoft.Xna.Framework.Audio.Microphone
            mic.BufferDuration = TimeSpan.FromSeconds(1);
            buffer = new byte[mic.GetSampleSizeInBytes(mic.BufferDuration)];

            // Create the event handler.  I could have done an anonymous 
            // delegate here if I had so desired.
            mic.BufferReady += handleBufferReady;
        }

        /// This is called every "buffer duration" (in our case 1 second) and copies out what the mic has
        /// in the buffer array to the memory stream.
        private void handleBufferReady(object sender, EventArgs e)
        {
            mic.GetData(buffer);
            stream.Write(buffer, 0, buffer.Length);
        }

        /// Initializes a new memory stream for new playtime.  Starts the mic.
        private void startButton_Click(object sender, RoutedEventArgs e)
        {
            stream = new MemoryStream();
            mic.Start();
            startButton.IsEnabled = false;
        }

        /// Stops the mic and writes out the file.
        private void stopButton_Click(object sender, RoutedEventArgs e)
        {
            mic.Stop();
            writeFile(stream);
            startButton.IsEnabled = true;
        }

        /// Writes our the file, using isolated storage.
        private void writeFile(MemoryStream s)
        {
            using (var userStore = IsolatedStorageFile.GetUserStoreForApplication())
            {
                if (userStore.FileExists(FILE_NAME))
                {
                    userStore.DeleteFile(FILE_NAME);
                }

                using (var file = userStore.OpenFile(FILE_NAME, FileMode.CreateNew))
                {
                    s.WriteTo(file);
                    playButton.IsEnabled = true;
                }                
            }
        }

        /// Playing our file with another piece of the Xna Framework
        private void playFile(byte[] file)
        {
            if (file == null || file.Length == 0) return;

            var se = new SoundEffect(file, mic.SampleRate, AudioChannels.Mono);
            SoundEffect.MasterVolume = 0.7f;
            se.Play();
        }

        /// A play is requested. Get the file from isolated storage and send
        /// its bytes to the playFile method.
        private void playButton_Click(object sender, RoutedEventArgs e)
        {
            using (var userStore = IsolatedStorageFile.GetUserStoreForApplication())
            {
                if (userStore.FileExists(FILE_NAME))
                {
                    var file = userStore.OpenFile(FILE_NAME, FileMode.Open, FileAccess.Read);
                    var bytes = new byte[file.Length];
                    file.Read(bytes, 0, bytes.Length);
                    playFile(bytes); 
                }
            }            
        }
    }
}

Examine this particular line:

private Microphone mic = Microphone.Default;

This code gives us a new Microsoft.Xna.Framework.Audio.Microphone object. We call for Microphone.Default and that gives us the default microphone on the system. The great thing about this is that on the phone is is the phone’s microphone, headset, etc, but in our simulator – your computer’s microphone is used. All of the other things that are done with this class are just the built-in XNA magic (documentation).

The only other piece we use here is the isolated storage. I get a reference to it in this line:

var userStore = IsolatedStorageFile.GetUserStoreForApplication()

After that, I basically use my variable userStore just like I would any other component in the System.IO namespace. That is really the power of Windows Phone 7 development. All of this code should be very familiar to .Net developers and behaves just like the phone was a little computer (which of course it is).

When we run our application, we see the following:
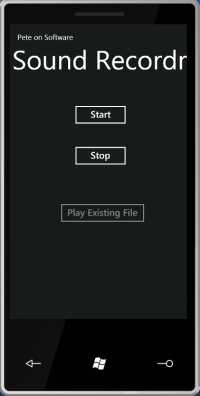
Initial State of our Sound Recordr Application

We cannot play the file yet because we haven’t recorded one. If we click “Start” and just talk or sing or make noise for the mic and then click “Stop”, we see that the “Play Existing File” button becomes activated.
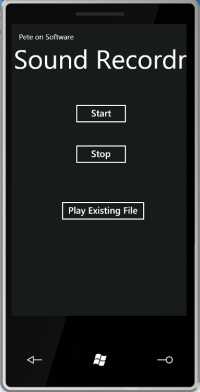
Sound Recordr after Recording

If you click “Play Existing File”, the file will be retrieved out of storage and played back with another excellent class from Microsoft.Xna.Framework.Audio, the SoundEffect class.

This is definitely demo code (read: it has bugs), and is only guaranteed to work on my machine and with the April CTP bits that I have loaded. Disclaimers aside, this definitely shows that developing for Windows Phone 7 should be extremely easy for anyone who knows or can learn .Net.

Windows Phone 7

Windows Phone 7 – A First Look at Development

Windows Phone 7Certainly by now you have heard of the new Windows Phone 7 that is due out later this year. I’ve heard that it will be a game changer, that it is a culmination of all of the lessons learned from other WinMo phones, etc. I do admit that it does sound like they’ve learned some lessons and the designs of the phones I’ve seen demoed are all very nice with appealing UIs.
The story for developers for Windows Phone 7 is a pretty good one. You have the option of either designing in Silverlight or using XNA, which is one way that you can make games for the Xbox 360. In both cases, there should be a good number of people with the skills to make phone applications already in the wings. And because it is Microsoft, you can expect that the tooling will be good (unlike another popular phone maker).

To get started, you need to head over to the Windows Phone 7 Developer Center and download the tools. At the time that I’m writing this, the April CTP refresh is the most recent offering, but as this is still pre-release software, several things could still change. Follow the instructions for installation and we will be ready to go.

The installer will install a version of Visual Studio Express specifically for developing for Windows Phone 7, so that is what I am going to be using for these examples.

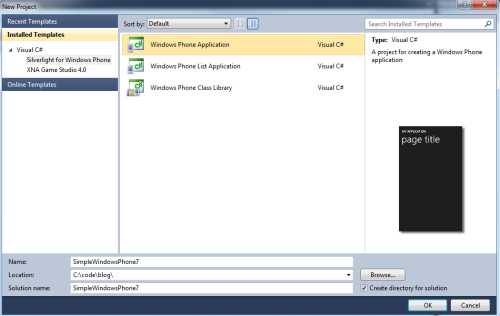
Let’s go File->New Project and select Visual C# -> Silverlight for Windows Phone -> Windows Phone Application. Set your Location and Name (I’ve chosen Simple Windows Phone 7) and then click “OK”.

Windows Phone File New Project

If you start with the MainPage.xaml, you can design the page’s UI. At this point, we are just doing some simple Silverlight stuff, so here is the XAML for the UI.

<phoneNavigation:PhoneApplicationPage 
    x:Class="SimpleWindowsPhone7.MainPage"
    xmlns="http://schemas.microsoft.com/winfx/2006/xaml/presentation"
    xmlns:x="http://schemas.microsoft.com/winfx/2006/xaml"
    xmlns:phoneNavigation="clr-namespace:Microsoft.Phone.Controls;assembly=Microsoft.Phone.Controls.Navigation"
    xmlns:d="http://schemas.microsoft.com/expression/blend/2008"
    xmlns:mc="http://schemas.openxmlformats.org/markup-compatibility/2006"
    mc:Ignorable="d" d:DesignWidth="480" d:DesignHeight="800"
    FontFamily="{StaticResource PhoneFontFamilyNormal}"
    FontSize="{StaticResource PhoneFontSizeNormal}"
    Foreground="{StaticResource PhoneForegroundBrush}">

    <Grid x:Name="LayoutRoot" Background="{StaticResource PhoneBackgroundBrush}">
        <Grid.RowDefinitions>
            <RowDefinition Height="Auto"/>
            <RowDefinition Height="*"/>
        </Grid.RowDefinitions>

        <!--TitleGrid is the name of the application and page title-->
        <Grid x:Name="TitleGrid" Grid.Row="0">
            <TextBlock Text="We're On A Windows 7 Phone" x:Name="textBlockPageTitle" Style="{StaticResource PhoneTextPageTitle1Style}"/>
            <TextBlock Text="Hello World" x:Name="textBlockListTitle" Style="{StaticResource PhoneTextPageTitle2Style}"/>
        </Grid>

        <!--ContentGrid is empty. Place new content here-->
        <Grid x:Name="ContentGrid" Grid.Row="1">
            <TextBlock Height="23" HorizontalAlignment="Left" Margin="205,44,0,0" Name="MyLabel" Text="" VerticalAlignment="Top" />
            <Button Content="Increment" Height="70" HorizontalAlignment="Left" Margin="137,146,0,0" Name="Incrementer" VerticalAlignment="Top" Width="184" Click="Incrementer_Click" />
        </Grid>
    </Grid>
    
</phoneNavigation:PhoneApplicationPage>

Basically, we have a layout grid that is going to be as tall as the space that we have. Within that grid is another grid which is placed in the first row of the parent. The line <Grid x:Name=”TitleGrid” Grid.Row=”0″> defines that. Within that TitleGrid, we have two textblocks that have two different styles (both of which are built in).

In the second row of the parent grid, we have another grid defined by <Grid x:Name=”ContentGrid” Grid.Row=”1″>. Within that grid is a TextBlock (kind of like a Label in WinForms or WebForms) and a Button. The button has a Click Event defined as Click=”Incrementer_Click”.

We can jump now to the code behind in MainPage.xaml.cs. If you have done WinForms, WebForms, or (obviously) Silverlight before, this will be very comfortable to you.

using System.Windows;
using Microsoft.Phone.Controls;

namespace SimpleWindowsPhone7
{
    public partial class MainPage : PhoneApplicationPage
    {
        protected int counter = 0;
        public MainPage()
        {
            // This stuff was given to us for free when the file was created.
            InitializeComponent();

            SupportedOrientations = SupportedPageOrientation.Portrait | SupportedPageOrientation.Landscape;
        }

        private void Incrementer_Click(object sender, RoutedEventArgs e)
        {
            // This method, I added.
            // We increment the counter, and then display it in a very familiar way.
            counter++;
            MyLabel.Text = string.Format("You have clicked {0} time(s)", counter);
        }
    }
}

That’s all there is to it. If you hit F6 you can build the app and F5 will deploy it to the Windows Phone 7 emulator and launch your application. You may notice that this takes a very long time the first time that you do this. That is because the software really is emulating the hardware and that emulator is running a full version of the actual Windows Phone 7 OS. It is booting up and getting deployed to exactly as if you had started with a phone, turned it on and plugged it in, deployed to it, and launched your application. To bypass that long delay, you can leave the emulator running between builds as you would your regular phone and just deploy and test to it over and over again.

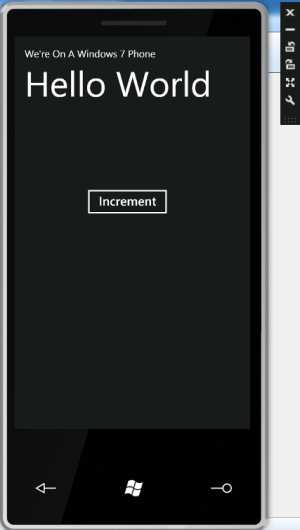
Here is the application after the deploy and launch.
Application Initial State

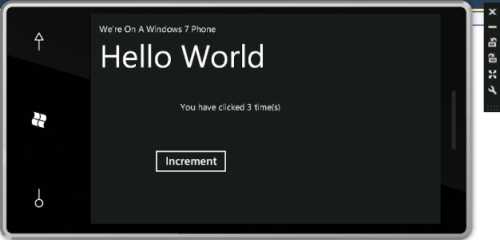
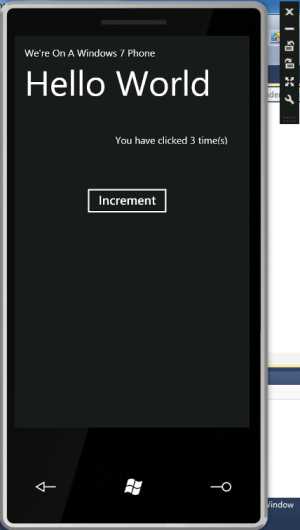
Here it is after I’ve clicked the button three times (I just wanted to make sure the code actually worked 😉 )
Launched Application, Clicked Three Times

Because of the “for free” code we got which declared that our application will run in Portrait or Landscape, if I turn the phone sideways you can see that things do turn and display in landscape mode for us.
Launched Application, Clicked Three Times - Landscape

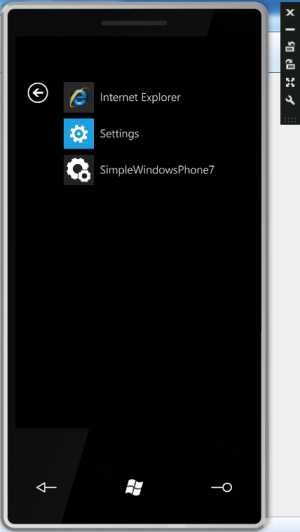
And here is what we see if I click the button at the bottom of the phone and navigate back to the main menu.
Our App on the Main Menu

As you can see, getting started with apps on the Windows Phone 7 is not very difficult and in my next Windows Phone 7 entry, we will dig a little deeper into what the SDK has to offer us.

Business of Software

Followship

Worker Bee.  Image from http://farm3.static.flickr.com/2474/3620767710_afe2621d10.jpgLast time, I talked about Management vs Leadership. Management seems to be a specific position in an organizational chart which demands a very special set of skills that not all people – even leaders – possess. We want our managers to be leaders, but at the same time people lead from a myriad of positions and by definition, you can’t be a leader if no one is following you.

Many different corporate initiatives and self-help guides encourage everyone to be a leader. However, if that goal is reached and everyone is a leader… who is following? I think there are two distinct answers to this conundrum. The first is that some people aren’t really cut out to be leaders. I have a friend named Mark who does not like to be in charge. He doesn’t like to lead anything. He is (by his own admission and definition) a worker bee. He likes to quote the problem of having “too many cooks in the kitchen” to say that not everyone should be in charge and some people need to be followers. I agree with this wholeheartedly.

It could be that the follower’s giftings and personal desires lead them to serve others and follow a direction outside of the spotlight. It could also be that this person is a leader-in-training who will someday lead others, but for a season this individual needs to sit at the feet of the master and learn the trade. Applying this to software, this future leader could be following in the steps and instruction of the mentor, modeling out what I described in this blog post.

There is another possibility for who will make up this group of followers. It could be that a leader is leading a group of leaders. This isn’t such a foreign concept. The president is Commander-in-Chief over his Generals who are over other officers who are over other officers on down the row. Even in our industry, we have maybe an Architect who leads the design of a system, a Team Lead who leads the implementation of that design, a Senior Developer who guides and shepherds Junior Developers. It is even possible that that group of Junior Devs might contain an individual whom the others look to for leadership. Maybe any one of these individuals is strictly a follower at work, but they are leaders on an open source project or in the community at large.

I believe that it all comes down to knowing when to lead. A great philosopher once told us to “Know Your Role” and I think that is particularly appropriate here. A great leader will always be looking for opportunities to lead, but if someone else has “got this”, then they can and should allow themselves to be led. There is always an opportunity to learn something from another leader, even if some of those lessons are what *not* to do.

Do not look down on following – it doesn’t make you a weaker person, it makes you a useful one. I’m not talking about “just following orders”, I’m talking about willfully giving yourself in service to a task, a cause, or another individual. Often, people want to confuse followers with something like what happened in Jonestown, and make “follow” a dirty word. Nothing could be further from the truth. Egos aside, by allowing themselves to be led, followers are the ones that get things done.

If you are someone who always has to lead, take it as an experiment to find a capable leader and allow yourself to be led. Learn from that leader’s style. Concern yourself with accomplishing your specific goals and not directing the greater vision – there is great freedom in that. You may even find that you are even more well-suited to this behavior. Even if you don’t, it will certainly improve your leadership skills and make you a more well-rounded person.