Category: Intro to Swift

Intro to Swift

Swift – Our First iOS Application

Apple's Swift LanguageLast time, we looked at creating functions in Swift. This time, we are going to stop being theoretical and playing in the playground and make an honest to goodness iOS application.

We won’t be getting any billion dollar valuations, but we are going to learn some fundamentals. As I thought about the best way to demonstrate all that there is to see and do when creating an iOS application, it occurred to me that a screencast was the best way to go. I hadn’t ever done one before, but why let that stop me? So, I got Camtasia for Mac, watched some tutorials, and hit record.

It is recorded in 720p HD, so you should change the quality on the video if you want to get the maximum effect. I’d welcome any feedback that you have to give, here or on the YouTube page itself.

Next time – now that we are Swift Veterans (for truth?) – I’m planning on preparing another screencast to make a more complicated iOS application that reads in a RESTful API, displays data, and allows us to interact with it.

Intro to Swift

Swift – Functions

Apple's Swift LanguageIn the previous post in our series, we looked at control structures in Swift: if statements, switch statements, for loops, and while loops. Today, we are going to look at how to create functions in Swift.

In Objective-C, an instance method would be defined this way:

- (NSString *)stringByReplacingOccurrencesOfString:(NSString *)target withString:(NSString *)replacement

Many newcomers to Objective-C (myself included!) find this syntax to be very confusing. Fortunately, the Swift version of function declaration is much much simpler. Here is a simple example to add two numbers:

func addTwoNumbers(firstAddend: Int, secondAddend: Int) -> Int {
    return firstAddend + secondAddend
}

You can then call it like this:

addTwoNumbers(7, 9)

The first important thing to note is that the function begins with a func keyword and its implementation body is wrapped in curly braces like C-based methods. Unlike C-based method syntax, the return type isn’t specified before the function name itself. Parameters, while in parentheses like C-based declarations, use a similar syntax to Objective-C with the name:type syntax.

As a side note, just like this Stack Overflow Answer, I’ve always thought that the difference between a function and a method was like this, “A method is on an object. A function is independent of an object. For Java, there are only methods. For C, there are only functions. For C++ it would depend on whether or not you’re in a class”. In Swift, even if a method is in a class (and Swift documentation refers to it as a “method”), it still uses the func keyword. I was thrown off by it a bit and I just wanted to point it out.

You can also accept a dynamic number of parameters in a Swift function. This is often used in string format commands or arguments to be parsed when you start an application. Here, lets just take in a dynamic number of numbers to add together.

// The declaration
func sumOf(addends: Int...) -> Int {
    var sum = 0
    
    for addend in addends {
        sum += addend
    }
    
    return sum
}

// All valid ways to call the function
sumOf(1,2,3)
sumOf(7,9)
sumOf(5,4,87,932,144,571)

In addition, you can also return multiple values from a function in the form of a Tuple. The declaration is very intuitive – given what we know so far. We just have to change our return type from Int or String into a custom Tuple type, in this case (String, String, String). To access each value, you just use the dot and then the index of the position in the Tuple that you want to access. See below:

func getSizes() -> (String, String, String) {
    return ("Small", "Medium", "Large")
}

var sizes = getSizes()

// Prints Small
println(sizes.0)

// Prints Medium
println(sizes.1)

// Prints Large
println(sizes.2)

The console output is then:
Swift Tuple Example

In Swift, functions are first class citizens and can be passed in as arguments, or returned as values. This can be used like the block syntax in Objective-C, or to work in Swift as a functional programming language paradigm. Here is an example of a function that returns another function, which can then be used later.

// Here is our function, you see that the return is
// a function that takes two ints and returns another int
func createSummingFunction() -> (Int, Int) -> Int {
    
    // I've declared a function scoped inside the parent function
    // Note that it has the same signature that we need to return
    func sumIt(addend1: Int, addend2: Int) -> Int {
        return addend1 + addend2
    }
    
    // Return the function like any other value
    return sumIt
}

// Assign the function to a new variable
var mySummer = createSummingFunction()

// Use the variable like it was the original function anyway
// Sets sum = 84
var sum = mySummer(7, 77)

Here is an example of a function that takes another function:

// Created a function that takes an array of integers as well as a function 
// and it returns an array of integers.  The function takes in an Int and returns an Int
func doSomethingToNumbers(list: [Int], operation: Int -> Int) -> [Int] {
    
    // Declare our Int array to return
    var returnValues = [Int]()
    
    // For every number we passed in
    for number in list {
        // pass that number to the passed in function ...
        var newNumber = operation(number)
        
        // ... and put the new value in the return array
        returnValues.append(newNumber)
    }
    
    // Return our Int array
    return returnValues
}

// We'll use the same array both times
var ourNumberList = [1,2,3]

// Declare a "Plus 1" function that meets the criteria
func plusOne (number: Int) -> Int {
    return number + 1
}

// Declare a "Times 2" function that meets the criteria
func timesTwo (number: Int) -> Int {
    return number * 2
}

// Added Array now contains [2,3,4]
var addedArray = doSomethingToNumbers(ourNumberList, plusOne)

// Multiplied Array now contains [2,4,6]
var multipliedArray = doSomethingToNumbers(ourNumberList, timesTwo)

Lastly, instead of a predefined function, I can also pass in an anonymous function. This allows us to get the same feature set as Objective-C’s block syntax. Assuming we still have our doSomethingToNumbers function and our ourNumberList array in scope, I could do this:

// Squared Array now contains [1,4,9]
var squaredArray = doSomethingToNumbers(ourNumberList, {(number: Int) -> Int in
        return number*number
    });

To pass in a function as a closure like that, you wrap the entire thing in curly braces, then you define the signature. Instead of using curly braces again to define the body of the function, you use the “in” keyword and define the body of your closure, like I did in the example above.

As you can see, Swift functions are simple and powerful with a syntax that is much easier to understand and read than Objective-C syntax. With very little effort, you should be able to grasp the syntax and start building reusable blocks of code. In the next post in this series, we’ll make a simple “Hello, World” application with Swift.

Intro to Swift

Swift – Control Structures

Apple's Swift LanguageIn the previous post in this Swift series, we looked at collections and iterating over those collections. In this post, I want to take a look at control structures. How does Swift allow you to make decisions in your code?

Much the same way that the for loop looked very familiar to us, only lacking parentheses, the if statement behaves the same way. As you’d expect, the following code outputs “You cannot register to vote”.

let age = 7;

if age >= 18 {
    println("You can register to vote")
} else {
    println("You cannot register to vote")
}

For a predefined number of “if statements”, many developers like to use a switch statement. Traditionally, in c-based languages, you would switch on a variable and then provide a case for each of your possibilities. Here is an example of a Swift Switch statement that would output “Back to the Grind” to the console.

let dayOfWeek = "Monday"

switch dayOfWeek {
    case "Saturday", "Sunday":
        println("Party!")
    case "Monday":
        println("Back to the Grind")
    case "Wednesday":
        println("Hump DAY")
    default:
        println("Just another day")
}

There are several interesting things to point out here. The first is that you don’t need break statements after each case. The reason for break statements is because when you want to have the same action for multiples cases, you would stack them without a break. In Swift, you just make a comma-separated list between the case keyword and the colon, as I did for Saturday and Sunday above. To me, this makes a lot of sense and is much cleaner.

If you omit the default option, though, you get an interesting error that says “error: switch must be exhaustive, consider adding a default clause”. That means that you must account for every possibility in your switch statement code. But how smart is it? Consider this example:

let guess = 7

switch guess {
    case 0:
        println("Your guess is 0")
    case let x where x > 0:
        println("Your guess is positive")
    case let x where x < 0:
        println("Your guess is negative")
}

This code covers every possible value for x and therefore is logically exhaustive. However, as it is, it also causes the “error: switch must be exhaustive, consider adding a default clause” error to appear. I have to change the code to this for it to work:

let guess = 7

switch guess {
    case 0:
        println("Your guess is 0")
    case let x where x > 0:
        println("Your guess is positive")
    case let x where x < 0:
        println("Your guess is negative")
    default:
        println("This will never ever get called")
}

I also added another interesting feature of Swift’s Switch statement and that is the ability to make a local copy of the variable and then use that to make any comparison rather than to compare only against a constant. That is another very powerful feature.

The While keyword is another way that we can control program execution. As is our pattern, this looks like a standard c-style while loop, minus the parentheses.

var number = -100

while number < 0 {
    println(number)
    number += 10
}

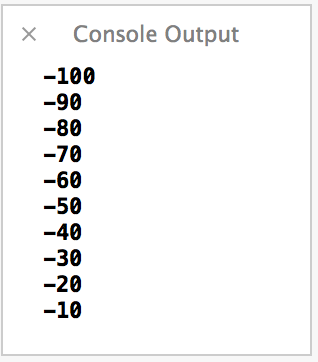
This gives us the following output:
Swift While Loop

But, what if our original value was 10, like this? Our code wouldn’t do anything.

var number = 10

while number < 0 {
    println(number)
    number += 10
}

If we want to ensure that our code is executed at least once, we can employ the do-while structure, which looks like this:

var number = 10

do {
    println(number)
    number += 10
} while number < 0

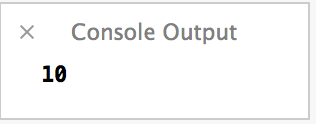
Now, we execute at least once before we see that we don’t meet the conditions.

Swift Do While Loop

That only leaves us one last basic control structure and that is the standard for loop. I have the option of doing the c-style parentheses-free version.

for var i = 1; i <= 10; i++ {
    println(i)
}

If I’m doing a range, though, I can also declare that range in a Ruby-ish way.

// ..< does not include the upper bound
for i in 1..<10 {
    println(i)
}

// ... does include the upper bound
for i in 1...10 {
    println(i)
}

UPDATE 7/16/2014: In Xcode 6 beta 3, the Swift language was changed and the non-inclusive range was changed from the “..” operator to “..<" for readability reasons. If you are on Beta 2 or less, use ..

That’s it for control structures. Next time, we’ll take it up a notch and take a look at declaring and calling functions in Swift.

Intro to Swift

Swift – Collections and Iterations

Apple's Swift LanguageLast time, we had a small intro to Swift and saw how to declare simple variables and do some string work. This time, we are going to look at some more complex types and take a look at how Swift does iteration over collections.

To declare an array, you can just use this simple syntax. Note that unlike Objective-C, you don’t have to nil terminate the array. Arrays are also zero-based, so given the array below, the value of favoritePodcasts[0] is “Hanselminutes”.

var favoritePodcasts = ["Hanselminutes", ".Net Rocks!", 
     "iPhreaks", "Pete on Software Podcast"]

The dictionary syntax is very similar to the array syntax and looks a lot like JavaScript JSON syntax.

var podcastHosts = [
    "Hanselminutes" : "Scott Hanselman",
    ".Net Rocks!" : "Carl Franklin and Richard Campbell",
    "iPhreaks" : "Charles Max Wood et al",
    "Pete on Software Podcast" : "Pete Shearer"
]

To access one of the entries, you just call it with the key, like JSON. In this case podcastHosts[“iPhreaks”] would be “Charles Max Wood et al”.

If you want to just declare an array or dictionary, you just use this simple syntax.

var emptyArray = [String]()
var emptyDictionary = Dictionary<Int, String>()

UPDATE 7/16/2014: In Xcode 6 Beta 3, the Swift syntax for arrays was changed from String[]() to [String]()

Now, let’s look at how we can iterate over these collections. This should be very comfortable syntax if you are familiar with JavaScript, minus the parentheses.

for podcast in favoritePodcasts {
    println(podcast)
}

This gives us the following output in the XCode Playground when I include it after the code that we’ve already written:
Swift Iterate an Array

Let’s take this up another notch and for each podcast, pull out its hosts from the dictionary and write those hosts to the console. We’ll use the iteration flow we just covered, the key-value dictionary retrieval syntax, and the string interpolation that we looked at last time to accomplish this.

for podcast in favoritePodcasts {
    var host = podcastHosts[podcast]
    println("\(podcast) is hosted by \(host)")
}

That will give us this result to the console:
Swift Iterate Array and Access Dictionary

What if I wanted to iterate over the dictionary? Again, we are going to find some very familiar syntax. I’m going to make a new dictionary below and then iterate over it, writing out the values. You’ll notice that unlike some languages, you get both variables declared in the for syntax, and you don’t have to iterate keys and then access the values from the dictionaries.

var citiesAndBaseballTeams = [
    "Cincinnati" : "Reds",
    "Pittsburgh" : "Pirates",
    "Cleveland" : "Indians",
    "Oakland" : "Athletics"
]

for (city, team) in citiesAndBaseballTeams {
    println("The \(team) play in \(city)")
}

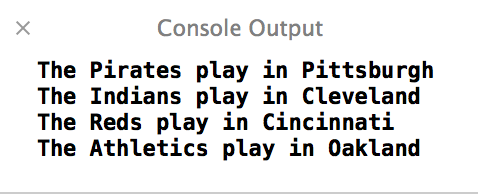
That gives us the following output:
Swift Dictionary Iteration

It is interesting to note that I did not change anything. It did print out of order with how I added those items. The dictionaries are definitely not expected to keep any kind of order for you when you iterate over them.

That’s it for this time. This post was starting to get a little long, so I’m going to save control flow for next time to try to keep this as focused and non-rambling as possible.

Intro to Swift

Intro to the Swift Programming Language

Apple's Swift LanguageThe biggest story out of the 2014 WWDC Keynote was easily the introduction of the new Swift Programming Language. Not to be confused with another language called Swift, a completely unrelated language used for parallel scripting, Swift is a fast and modern language that designed for safety.

When I say that it is fast, what does that mean? During the keynote, they gave a benchmark sorting a list of objects. They declared Python to be a baseline and claimed that Objective-C was 2.8 times faster than Python. That makes sense because Python is typically interpreted (as it most likely was for this benchmark) and Objective-C is compiled. So, what about Swift? Swift was 3.9 times faster than Python, an impressive improvement over Objective-C.

What about something a little more computationally difficult? With Python again as a baseline, RC4 encryption is 127 times faster in Objective-C. However, Swift is actually 220 times faster than Python, which is an even larger gap than the more simple object sort benchmark. I think we might be beginning to see where the language’s name came from.

What about the “designed for safety” part? What does that even mean? What that means is that you literally cannot shoot yourself in the foot with many common errors because they are just not possible in the Swift language. You cannot cause buffer overflows, operate on uninitialized variables, use Gotos, perform unsafe string formatting, etc. The language is set up in a way to allow you to “fall into the pit of success” with regards to many language errors that leave security holes.

What about modern? One thing is that Swift has modern features like closures, generics, namespaces, type inference, and multiple return types. The other thing is that the language syntax feels very modern. It feels a lot like Ruby and JavaScript and it ditches a lot of the “ceremony” that you had to adhere to when writing Objective-C. I’ll admit that I hated Objective-C, but Stockholm Syndrome has set in and I have actually enjoyed using it of late. I’ll be interested to see if the Ease of Use™ of Swift will make my Stockholm Syndrome fade away and make me see what I’ve been missing.

The other really neat thing about Swift is its REPL, which is implemented in Xcode Playgrounds. A playground looks like this:

Swift Playground

This playground example also demonstrated some of the syntax. Like Javascript and C#, you can just declare the variable with the var keyword and its type will be inferred. The let keyword creates a constant. If we need to help Swift infer a type, we can use the :Type syntax. We can see examples of all three of these below:

var str = "Hello, playground" // inferred as a string
var age = 7 // inferred as an int
let planetName = "Earth" // a constant string

var salary = 4000 // inferred as an int, but that's wrong
var salaryCorrect :Double = 4000 // now given the hint to be a Double instead

Types are still very important to Swift, though. For instance, if I try to execute this code:

let greeting = "Hi, I was born in "
let year = 1977
let completeGreeting = greeting + year

If I do that, I get the error “‘String’ is not convertible to ‘UInt8′”.
Update 7/16/2014 – As of Xcode 6 Beta 3, this error changed to this from the previous error of “Could not find an overload for ‘+’ that accepts the supplied arguments”

Instead, I have to explicitly cast the int to a string like this:

let greeting = "Hi, I was born in "
let year = 1977
let completeGreeting = greeting + String(year)

One final example in this simple introduction to Swift is the much easier way to do what I just did above. Wouldn’t it be easier if I could do something like C#’s String.Format() or Ruby’s string interpolation? Yes it would, and yes I can! My previous example could also be written this way:

let year = 1977
let completeGreeting = "Hi, I was born in \(year)"

And what if I wanted to execute a little bit of code via an expression in there? I could easily do that like this:

let year = 1977
let completeGreeting = "Hi, I was born in \(year)."
let altGreeting = "If I had been born 10 years later, it would have been \(year + 10)"

This post just scratched the surface of what Swift is and how its syntax can be used to handle simple variables. In my next Swift post, I’ll cover some more complex types, control flows, and how to declare functions.