Category: iOS

iOS

Our First WatchKit App – WatchCounter

In my last podcast episode, I talked about the Apple Watch Event and also a bit about what developing for the watch is like. WatchKit isn’t something that you can just create as a standalone application. Every WatchKit application must have a phone application. No processing happens on the watch, it is just a “dumb screen” for the application on the phone. So even if the entirety of what you are building is for the watch, the phone component must still be installed. The phone component is the “brains of the operation”.

Here is a diagram of WatchKit architecture from Apple
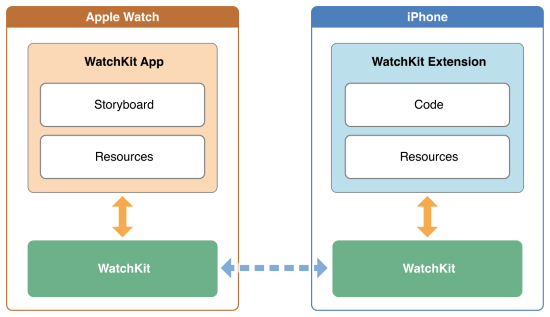
WatchKit Architecture from Apple, originally here: https://developer.apple.com/library/prerelease/ios/documentation/General/Conceptual/WatchKitProgrammingGuide/Art/app_communication_2x.png

And, here is one that I created to expound on it a little bit:
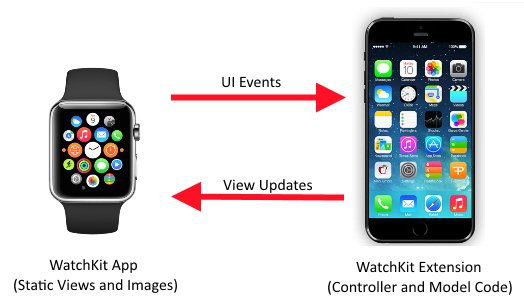
WatchKit Architecture

Let’s walk through making a very simple application. The source for this application is available on GitHub, or you can follow along.

First, we need to make a phone application. You see that WatchKit isn’t any of our options, so I’m choosing to make a Single View application.
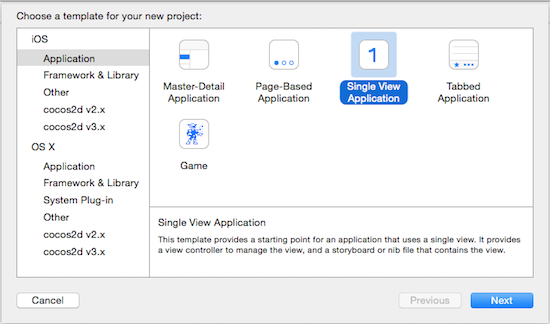
You cannot File->New WatchKit” title=”You cannot File->New WatchKit” /></p>
<p>Next, I name it WatchCounter, make sure the language is Swift and the device is the iPhone and click Next.<br />
<img decoding=

At this point, we just have a standard iOS application and XCode appears as it always does.
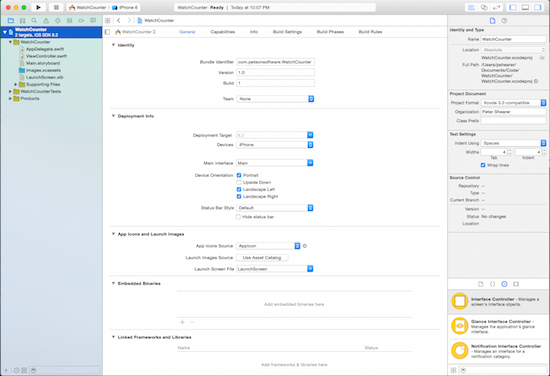
Xcode before adding WatchKit

With the project selected in the explorer pane, make sure that your Target window is visible. If not, click this button to show it.
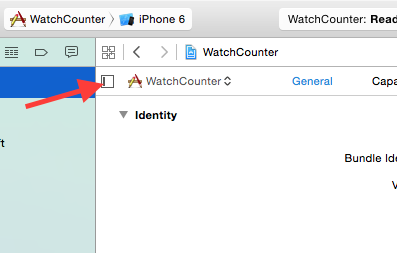
Show Target Drawer in XCode

Next, click the plus sign indicated here to bring up the Add Target window.
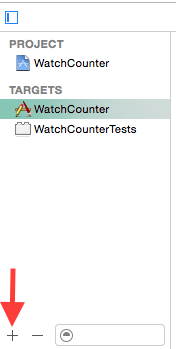
Xcode Add Target

We are going to choose an Apple Watch -> WatchKit App Target Template
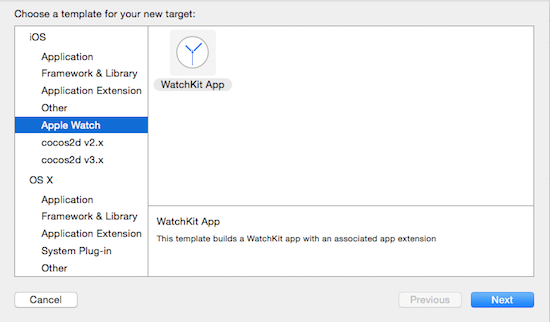
WatchKit Target

For the options, we are just making a simple application, so leave most of the defaults. We are going to make sure that the checkboxes are cleared next to “Include Notification Scene” and “Include Glance Screen”. If you forget, it won’t be the end of the world. Our Watch Storyboard will just be a little cluttered. Because we wouldn’t be using those screens for this sample, they wouldn’t affect what we’re doing right now.
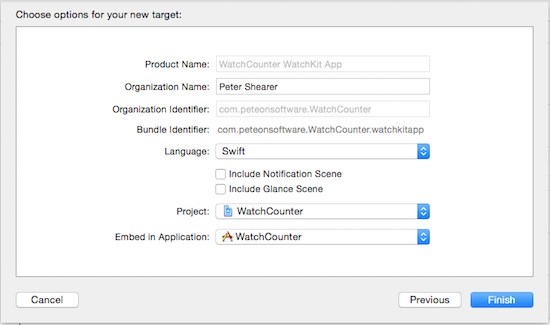
Xcode WatchKit Target Options

After you are done and click “Finish”, you are presented with this dialog (if you haven’t previously told it to never show again). Click “Activate” so we can continue.
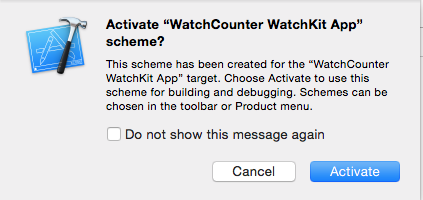
Activate WatchKit App scheme

At this point, your project will be changed. Added to our project are two new folders: WatchCounter WatchKit Extension, and WatchCounter WatchKit App. For this project, the only thing we care about in the “App” folder is the Interface.storyboard and the only thing in the Extension folder we need is InterfaceController.swift.
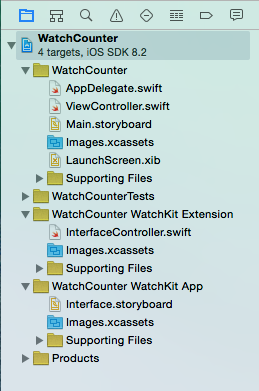
Our new project structure with the WatchKit pieces added

If we click the storyboard, we’ll see this:
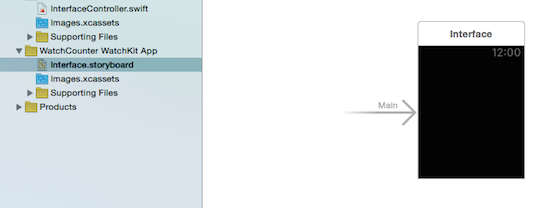
WatchKit Storyboard

Go to the controls (bottom right of Xcode by default) and find the Button and Label controls.
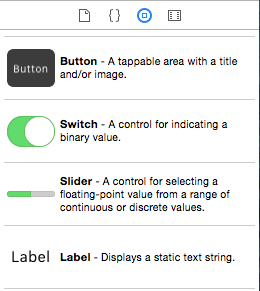
Button and Label Controls in Xcode

Drag the label onto the watch storyboard, followed by the button. The watch has a “flow” layout and will just stack the controls on top of each other with no overlap. You don’t have access to auto-layout or precise positioning. There are ways to group some controls horizontally, but for now we can be fine with stacking the controls.
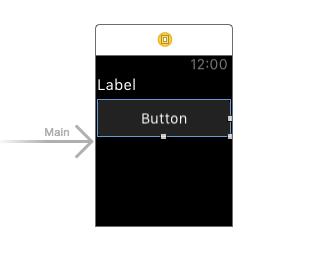
Button and Label on the Storyboard

Select the label on the storyboard and go over to the properties window and change the values to the ones that you see here. The label’s text will change when the app starts up, so I just have some text in there so it is easy to see and select while we are working with it visually.
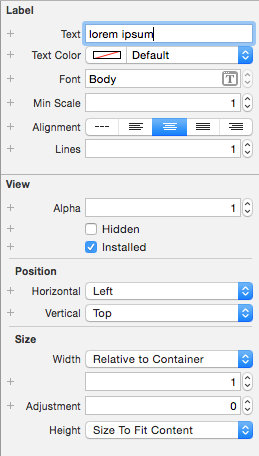
Setting the label's properties

Next, select the button on the storyboard and then set its properties.
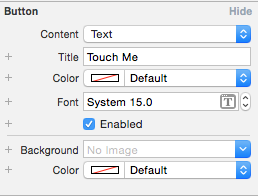
Setting the button's properties

Now, if you click the assistant editor button while on the storyboard, it will bring up the code for the view controller side by side.
Assistant Editor

Click on the label to select it and then hold down control, click on the label, and drag over to the code window and let go right above the awakeWithContext method. A dialog will come up to create an outlet. Name it displayLabel and click to accept.

Next, control click the button and drag over to the code window right below the awakeWitContext method. It will again ask you to create an IBOutlet, but use the dropdown to change to an IBAction, name it buttonWasPressed and accept.

Next, type in the rest of the code shown here. All we are doing is creating a counter variable and then updating the label, keeping track of how many times we clicked. It should be fairly straightforward.

import WatchKit
import Foundation


class InterfaceController: WKInterfaceController {
    @IBOutlet var displayLabel: WKInterfaceLabel!
    var counter = 0

    override func awakeWithContext(context: AnyObject?) {
        super.awakeWithContext(context)
        
        // Configure interface objects here.
        updateMessage()
    }

    @IBAction func buttonWasPressed() {
        counter++;
        updateMessage()
    }
    
    func updateMessage() {
        var message = "Pressed:\(counter) time(s)"
        displayLabel.setText(message)
    }
}

Now, make sure that the WatchCounter WatchKit App is still the active schema and you are targeting the iPhone 6 simulator.
Run the application

When you run it, should should launch the phone and watch simulator and get a watch app up that runs like this:
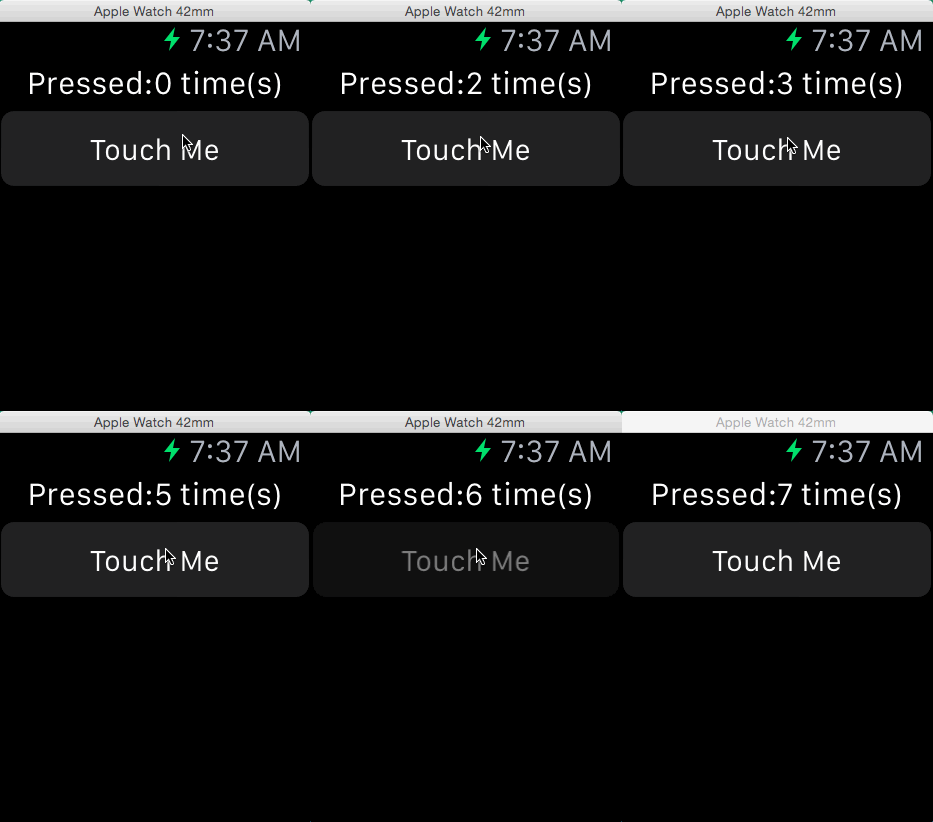
WatchCounter Demo

That’s it. If you have any questions, let me know. Again, if you want to check this out and poke around rather than follow along, the code for this application is available on GitHub.

Android

Podcast Episode 26 – Rondale Williams on Android and Breaking Into the Game

Rondale WilliamsThis time, in Episode 26, I interview Rondale Williams. Rondale is a freelance mobile developer new to the development space. During the course of our interview, Rondale talks about what it is like to be self-taught, why he started to go back to college for CS, and what his advice would be to other people just starting out. We also talk about RxJava, Android Emulators, the Android vs iOS development ecosystems, and whether or not he’s found the community to be friendly.

Links Mentioned in this Show:
Rondale’s Blog
Rondale’s Twitter
Rondale’s LinkedIn
RxJava
Genymotion
Lynda.com
Pluralsight
The New Boston (Bucky’s World)
Udemy
Udacity
Meetup
RemoteCoder.io

You can also subscribe to the podcast at any of these places:
iTunes Link RSS Feed

Thanks to all the people who listen, and a special thanks to those who have rated me. I really appreciate it.

The episodes have been archived. Click Here to see the archive page.

Dimecast

My First Dimecast is Up!

I’ve been a fan of Dimecasts (Link Removed) for some time. In fact, four and half years ago I mentioned the site in a post on this very blog. Unfortunately, the site hadn’t been updated with a new video in almost two and a half years.

I kept checking in with it periodically, but never saw updates. One day, my curiosity got the better of me and I started looking around the Internet and I found that Dave Schinkel was planning to take the site over from Derik Whittaker. I reached out to see if I could help and Dave was gracious enough to let me play along.

The site is still going to be undergoing a redesign (to be casted, of course), but for now, Dave has re-encoded all of the old videos to MP4 from WMV, boosted the volume, and added a modern player.

All of that being said, I am proud to announce the first new Dimecast in 2.5 years, Episode 206 – Learning Objective-C – Part 1 (Link Removed).

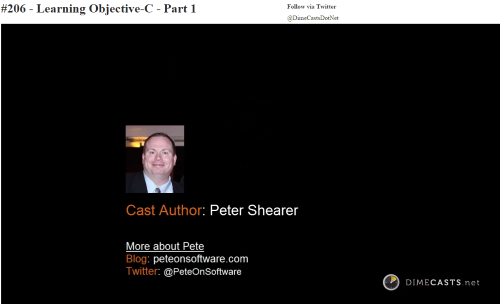
Author Screen from my Learning Objective-C Part 1 Dimecast
(A Screenshot of the Author Screen)

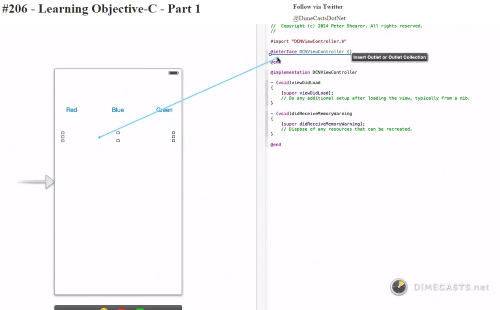
Sample Action Screen from my Learning Objective-C Part 1 Dimecast
(A Screenshot of me in action 😉 )

The goal is to roll out a lot of new episodes about a lot of different topics soon and get the site back into a vibrant place to help developers learn new skills.

I’m very excited for what’s to come and I hope that you go check out the episode (Link Removed).

Intro to Swift

Swift – Our First iOS Application

Apple's Swift LanguageLast time, we looked at creating functions in Swift. This time, we are going to stop being theoretical and playing in the playground and make an honest to goodness iOS application.

We won’t be getting any billion dollar valuations, but we are going to learn some fundamentals. As I thought about the best way to demonstrate all that there is to see and do when creating an iOS application, it occurred to me that a screencast was the best way to go. I hadn’t ever done one before, but why let that stop me? So, I got Camtasia for Mac, watched some tutorials, and hit record.

It is recorded in 720p HD, so you should change the quality on the video if you want to get the maximum effect. I’d welcome any feedback that you have to give, here or on the YouTube page itself.

Next time – now that we are Swift Veterans (for truth?) – I’m planning on preparing another screencast to make a more complicated iOS application that reads in a RESTful API, displays data, and allows us to interact with it.

Intro to Swift

Swift – Functions

Apple's Swift LanguageIn the previous post in our series, we looked at control structures in Swift: if statements, switch statements, for loops, and while loops. Today, we are going to look at how to create functions in Swift.

In Objective-C, an instance method would be defined this way:

- (NSString *)stringByReplacingOccurrencesOfString:(NSString *)target withString:(NSString *)replacement

Many newcomers to Objective-C (myself included!) find this syntax to be very confusing. Fortunately, the Swift version of function declaration is much much simpler. Here is a simple example to add two numbers:

func addTwoNumbers(firstAddend: Int, secondAddend: Int) -> Int {
    return firstAddend + secondAddend
}

You can then call it like this:

addTwoNumbers(7, 9)

The first important thing to note is that the function begins with a func keyword and its implementation body is wrapped in curly braces like C-based methods. Unlike C-based method syntax, the return type isn’t specified before the function name itself. Parameters, while in parentheses like C-based declarations, use a similar syntax to Objective-C with the name:type syntax.

As a side note, just like this Stack Overflow Answer, I’ve always thought that the difference between a function and a method was like this, “A method is on an object. A function is independent of an object. For Java, there are only methods. For C, there are only functions. For C++ it would depend on whether or not you’re in a class”. In Swift, even if a method is in a class (and Swift documentation refers to it as a “method”), it still uses the func keyword. I was thrown off by it a bit and I just wanted to point it out.

You can also accept a dynamic number of parameters in a Swift function. This is often used in string format commands or arguments to be parsed when you start an application. Here, lets just take in a dynamic number of numbers to add together.

// The declaration
func sumOf(addends: Int...) -> Int {
    var sum = 0
    
    for addend in addends {
        sum += addend
    }
    
    return sum
}

// All valid ways to call the function
sumOf(1,2,3)
sumOf(7,9)
sumOf(5,4,87,932,144,571)

In addition, you can also return multiple values from a function in the form of a Tuple. The declaration is very intuitive – given what we know so far. We just have to change our return type from Int or String into a custom Tuple type, in this case (String, String, String). To access each value, you just use the dot and then the index of the position in the Tuple that you want to access. See below:

func getSizes() -> (String, String, String) {
    return ("Small", "Medium", "Large")
}

var sizes = getSizes()

// Prints Small
println(sizes.0)

// Prints Medium
println(sizes.1)

// Prints Large
println(sizes.2)

The console output is then:
Swift Tuple Example

In Swift, functions are first class citizens and can be passed in as arguments, or returned as values. This can be used like the block syntax in Objective-C, or to work in Swift as a functional programming language paradigm. Here is an example of a function that returns another function, which can then be used later.

// Here is our function, you see that the return is
// a function that takes two ints and returns another int
func createSummingFunction() -> (Int, Int) -> Int {
    
    // I've declared a function scoped inside the parent function
    // Note that it has the same signature that we need to return
    func sumIt(addend1: Int, addend2: Int) -> Int {
        return addend1 + addend2
    }
    
    // Return the function like any other value
    return sumIt
}

// Assign the function to a new variable
var mySummer = createSummingFunction()

// Use the variable like it was the original function anyway
// Sets sum = 84
var sum = mySummer(7, 77)

Here is an example of a function that takes another function:

// Created a function that takes an array of integers as well as a function 
// and it returns an array of integers.  The function takes in an Int and returns an Int
func doSomethingToNumbers(list: [Int], operation: Int -> Int) -> [Int] {
    
    // Declare our Int array to return
    var returnValues = [Int]()
    
    // For every number we passed in
    for number in list {
        // pass that number to the passed in function ...
        var newNumber = operation(number)
        
        // ... and put the new value in the return array
        returnValues.append(newNumber)
    }
    
    // Return our Int array
    return returnValues
}

// We'll use the same array both times
var ourNumberList = [1,2,3]

// Declare a "Plus 1" function that meets the criteria
func plusOne (number: Int) -> Int {
    return number + 1
}

// Declare a "Times 2" function that meets the criteria
func timesTwo (number: Int) -> Int {
    return number * 2
}

// Added Array now contains [2,3,4]
var addedArray = doSomethingToNumbers(ourNumberList, plusOne)

// Multiplied Array now contains [2,4,6]
var multipliedArray = doSomethingToNumbers(ourNumberList, timesTwo)

Lastly, instead of a predefined function, I can also pass in an anonymous function. This allows us to get the same feature set as Objective-C’s block syntax. Assuming we still have our doSomethingToNumbers function and our ourNumberList array in scope, I could do this:

// Squared Array now contains [1,4,9]
var squaredArray = doSomethingToNumbers(ourNumberList, {(number: Int) -> Int in
        return number*number
    });

To pass in a function as a closure like that, you wrap the entire thing in curly braces, then you define the signature. Instead of using curly braces again to define the body of the function, you use the “in” keyword and define the body of your closure, like I did in the example above.

As you can see, Swift functions are simple and powerful with a syntax that is much easier to understand and read than Objective-C syntax. With very little effort, you should be able to grasp the syntax and start building reusable blocks of code. In the next post in this series, we’ll make a simple “Hello, World” application with Swift.