Tag: Code Tips

Code Tips

NLog

Every application needs logging. It is, of course, especially helpful if you need to provide a user with just an apology message, but you need to store all kinds of data about the exception so that you can reproduce and debug it. Many people write their own because at its core, what you are doing it writing a string to a text file or saving a string to a database. However, to make that operation very robust, you need to do a lot of defensive coding around the operation.

This causes many people to turn to logging libraries like NLog. Quoting from their website, they indicate that NLog is able to do the following:

  • the ability to control the level of detail of our trace messages (such as displaying only warnings and errors or very detailed program trace)
  • the possibility of turning the tracing on and off for components of our proram separately, without turning the application off and recompiling it
  • writing trace messages to the file, system log, message queue or other output
  • being able to send particularly important messages by email or store them in a database
  • and others…

You can target your logs to go to a file, a console, email, a database, a message queue, event logs, pretty much anywhere that it would make sense for them to go. In addition, if you aren’t happy with the targets that NLog provides, you can write your own.

To get started with NLog, you can download it from here.

After you get it downloaded and extracted, you can either put the appropriate .dll (in my case I’m going to use NLog.dll v. 1.0.0.505, labeled as NLog for .Net 2.0) in the GAC or store it somewhere that you put your shared .dlls so that you know where to go and reference it later. For this example, I’m just going to copy it right into my bin folder.

Create a new C# console application, named whatever you like. Add a reference to the NLog .dll and then add an application configuration file to your application (Right click on project–>Add–>New Item–>Application Configuration File). Put the following code into your application config file (app.config). All of the ${} stuff are just variables that NLog understands. They are all pretty straightforward and for a complete list, go see their website.

<?xml version="1.0" encoding="utf-8" ?>
<configuration>
  <configSections>
    <section name="nlog" type="NLog.Config.ConfigSectionHandler, NLog"/>    
  </configSections>
  <nlog xmlns="http://www.nlog-project.org/schemas/NLog.xsd"
      xmlns:xsi="http://www.w3.org/2001/XMLSchema-instance">
    <targets>
      <target name="console" xsi:type="Console" layout="${shortdate}|${level}|${message}" />
      <target name="file" xsi:type="File" layout="${longdate}|${stacktrace}|${message}" fileName="c:\Logs\${logger}.txt" />
    </targets>
    <rules>
      <logger name="*" minlevel="Debug" writeTo="console" />
      <logger name="*" minlevel="Error" writeTo="file" />
    </rules>
  </nlog>
</configuration>

A small bit of explanation of the XML file. The targets section allows you to specify what kind of messages go to what kind of logging endpoint. The rules tell NLog where to go with certain types of messages, for instance, you can log Error to the file system, but just show debugging messages in the console.

Now, for the C# code. In your Program.cs, you can put the following code:

using NLog;

namespace NLogSample
{
    class Program
    {
        private static Logger logger = LogManager.GetCurrentClassLogger();

        static void Main(string[] args)
        {
            logger.Debug("I won't go to the file, but I'll go to the screen");
            logger.Error("I'll do both.");
        }
    }
}

When you run this sample, you see this:

Output from our simple NLog Example

When I look in the log file, which I specified as c:\Logs\{name of logger, which is by default Namespace.Class}.txt, I find the following:

2008-07-29 10:43:45.8617|Program.Main|I'll do both.

That’s all there is to using NLog. As you can see, setting it up and using it is a snap and exposes much more functionality than common “roll your own” implementations. If you are doing web applications, the code from our app.config can go in the web.config and then you are all set to go.

We use NLog with my current employer and I couldn’t be happier with the results. If you don’t have a good logging framework in place, give NLog a try. Also, look around their site and give some of the other logging options a try.

Code Tips

Web Services Software Factory (5 of 5)

Note: All links current as of the time of this blog post

We have landed. This is tutorial part 5 of 5. In parts 1-4 (part 1 starts here) we created a web service that does some simple encryption, decryption, and hashing. Before beginning this part of the tutorial, please create a virtual directory in IIS pointing to the Web Service project that you set up in part 4 and make it a .Net application. I named the virtual directory CryptService and as such I can browse to http://localhost/CryptService/CryptService.svc and see the service.

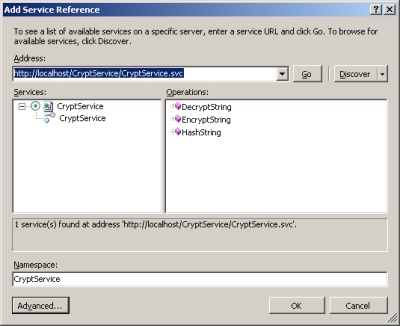
Create a new C# Console Application. I named my application TestCryptService. Right click on your project in solution explorer and select “Add Service Reference”. Put your URL to your service in and click Go. After a few moments, you should see what was discovered about your service. Change the namespace to CryptService and click Ok.
Add Service Reference to Project

Notice that all of the binding information has been added to your app.config. If you look at the endpoint section, you will see that /basic was added to the end of the CryptService.svc. I mentioned last time that that allows you to create multiple endpoints to the same point, and just use different bindings, etc.

<?xml version="1.0" encoding="utf-8" ?>
<configuration>
    <system.serviceModel>
        <bindings>
            <basicHttpBinding>
                <binding name="Crypt" closeTimeout="00:01:00" openTimeout="00:01:00"
                    receiveTimeout="00:10:00" sendTimeout="00:01:00" allowCookies="false"
                    bypassProxyOnLocal="false" hostNameComparisonMode="StrongWildcard"
                    maxBufferSize="65536" maxBufferPoolSize="524288" maxReceivedMessageSize="65536"
                    messageEncoding="Text" textEncoding="utf-8" transferMode="Buffered"
                    useDefaultWebProxy="true">
                    <readerQuotas maxDepth="32" maxStringContentLength="8192" maxArrayLength="16384"
                        maxBytesPerRead="4096" maxNameTableCharCount="16384" />
                    <security mode="None">
                        <transport clientCredentialType="None" proxyCredentialType="None"
                            realm="" />
                        <message clientCredentialType="UserName" algorithmSuite="Default" />
                    </security>
                </binding>
            </basicHttpBinding>
        </bindings>
        <client>
            <endpoint address="http://localhost/CryptService/CryptService.svc/basic"
                binding="basicHttpBinding" bindingConfiguration="Crypt" contract="CryptService.CryptService"
                name="Crypt" />
        </client>
    </system.serviceModel>
</configuration>

Now, within the Program.cs file that was created for you, enter in this code:

using System;
using System.Collections.Generic;
using System.Linq;
using System.Text;
using TestCryptService.CryptService;

namespace TestCryptService
{
    class Program
    {
        static void Main(string[] args)
        {
            TestDesEncryption();
            TestRijndaelEncryption();
            TestMd5Hash();
            TestSha256Hash();
        }

        /// <summary>
        /// This method is the only one that is commented.  All of the other methods function 
        /// in exactly the same way.  The only reason they are included is for completeness, 
        /// so that all of our server methods are hit.
        /// </summary>
        static void TestDesEncryption()
        {
            // The CryptServiceClient is the proxy created automatically for you.
            // It would be called CryptServiceClient whether you used svcutil.exe 
            // yourself or you added a service reference.
            CryptServiceClient client = new CryptServiceClient();
            

            EncryptionObject encryptionObject = new EncryptionObject();

            encryptionObject.EncryptionAlgorithm = EncryptionAlgorithm.DES;
            encryptionObject.Text = "Testing our DES Encryption";

            // Call the EncryptString method and get back our encrypted value
            string encryptedText = client.EncryptString(encryptionObject);

            encryptionObject = new EncryptionObject();
            encryptionObject.EncryptionAlgorithm = EncryptionAlgorithm.DES;
            encryptionObject.Text = encryptedText;

            // Call the DecryptString method and get back our plain text
            string plainText = client.DecryptString(encryptionObject);

            // Output the values and see what we get.
            Console.WriteLine("-- DES --");
            Console.WriteLine("Encrypted Text: {0}", encryptedText);
            Console.WriteLine("Plain Text: {0}", plainText);
            Console.WriteLine();
        }

        static void TestRijndaelEncryption()
        {
            CryptServiceClient client = new CryptServiceClient();
            EncryptionObject encryptionObject = new EncryptionObject();

            encryptionObject.EncryptionAlgorithm = EncryptionAlgorithm.Rijndael;
            encryptionObject.Text = "Testing our Rijndael Encryption";

            string encryptedText = client.EncryptString(encryptionObject);

            encryptionObject = new EncryptionObject();
            encryptionObject.EncryptionAlgorithm = EncryptionAlgorithm.Rijndael;
            encryptionObject.Text = encryptedText;

            string plainText = client.DecryptString(encryptionObject);

            Console.WriteLine("-- Rijndael --");
            Console.WriteLine("Encrypted Text: {0}", encryptedText);
            Console.WriteLine("Plain Text: {0}", plainText);
            Console.WriteLine();
        }

        static void TestMd5Hash()
        {
            CryptServiceClient client = new CryptServiceClient();
            HashObject hashObject = new HashObject();

            hashObject.HashType = HashType.MD5;
            hashObject.StringToHash = "Some string to hash";

            string md5Hash = client.HashString(hashObject);

            Console.WriteLine("-- MD5 Hash --");
            Console.WriteLine("Original String: {0}", hashObject.StringToHash);
            Console.WriteLine("Hashed Value: {0}", md5Hash);
            Console.WriteLine();
        }

        static void TestSha256Hash()
        {
            CryptServiceClient client = new CryptServiceClient();
            HashObject hashObject = new HashObject();

            hashObject.HashType = HashType.SHA256;
            hashObject.StringToHash = "Some string to hash";

            string shaHash = client.HashString(hashObject);

            Console.WriteLine("-- Sha256 Hash --");
            Console.WriteLine("Original String: {0}", hashObject.StringToHash);
            Console.WriteLine("Hashed Value: {0}", shaHash);
            Console.WriteLine();
        }
    }
}

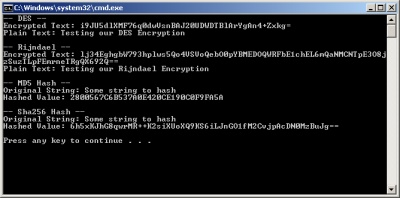
When I run this code, I see this output:
Test Console Output

That is IT! If you’ve made it this far and see that output, you are done. You are now ready to use the Web Services Software Factory to make web services yourself. As always, if you didn’t get these results, double check your steps and if you are still having problems, leave me a comment and I will try to help you.

All code was written as throwaway code, so I realize that it could use some refactoring and some optimization. The point of this tutorial was to expose you to using the WSSF in more than a “Hello World” kind of way and to at least mimic the real world with something a little bit fun.

Code Tips

Web Services Software Factory (4 of 5)

Note: All links current as of the time of this blog post

We are in the home stretch. If you haven’t already, you may want to take a look at tutorial parts 1, 2, and 3 before beginning this one.

At this point, we’ve defined our service, created Data Contracts and Service Contracts, implemented the serivce, and programmed the code behind the endpoints. All we have left to do before this service is fully functional is to create the Host Contracts, which will set up the actual endpoints for us.

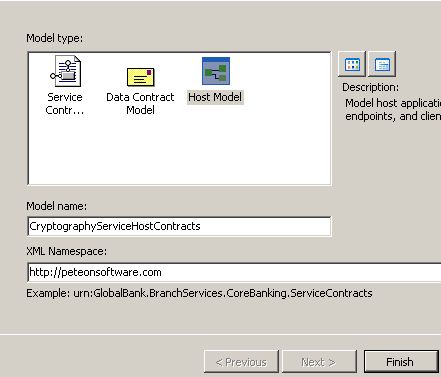
In your Solution Explorer, right click on the MyCryptographyService.model and choose Add –> New Model. In the dialog, select Host Model and complete the the form and click finish.
New Host Contract Model Dialog

This brings up a new designer surface for the Host Designer.
Host Model Designer

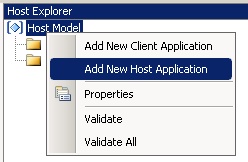
The very first thing we need to do is to right click on the Host Model in the Host Explorer and select “Add New Host Application”.
Add New Host Application Menu

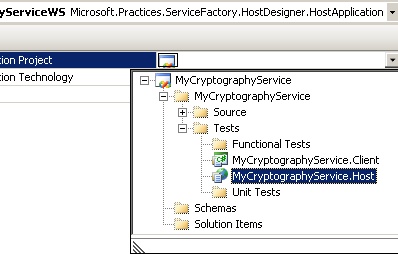
This will create HostApplication1. Right click on it and view properties. Change the name to “CryptographyServiceWS” and the Implementation Technology to “WCF Extensions”. For Implementation Project you need to pick the project that is going to be the one the people will actually connect to. You can create your own Web Services project if you’d like, but there is one already included for us, so I will use that one for the purposes of this experience. Expand the dropdown as shown below and choose MyCrytographyService.Host.
Choose a Host Project

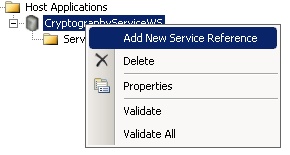
Return to the Host Explorer, right click on CryptographyServiceWS and choose “Add New Service Reference”. This creates ServiceReference1.
Add Service Reference to Host

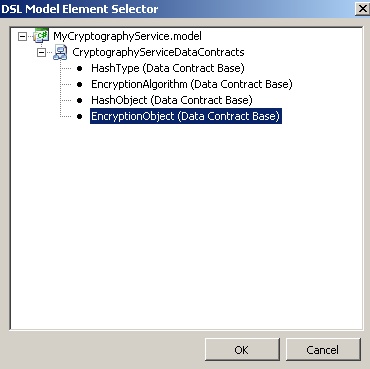
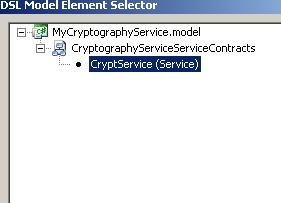
Right click on ServiceReference1, choose properties and set its name to CryptService. Select to Enable Metadata Publishing to true. For Service Implementation Type, click the ellipses to bring up this dialog and choose CryptService.
DSL Model Element Selector

Go back to the Host Explorer. Right click on CryptService and choose “Add New Endpoint”. Endpont1 will appear. Right click on Endpoint1, select properties and change its name to Crypt, leave Binding Type at basicHttpBinding, and enter “Basic” in the Address field. As the tooltip says, the Address field allows you to append something to the name of the endpoint so that you can create many different endpoints, each to the same code. The point being to allow users to connect with many different bindings, but to do that you must create an endpoint for each. Rather than have many different endpoint names, you can just add a suffix. Additionally, this can also be used to version the endpoints on your service.

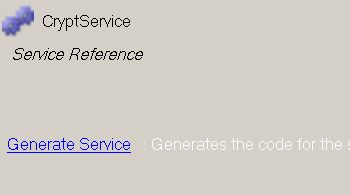
That’s it. When you click again on CryptService in the Host Explorer, you see this screen on the left. Click “Generate Service” and if you’ve done everything correctly, you should be set to go. If you do not see this screen, that means you have left out a step. Please review the tutorial up to this point and if you are still stuck, leave me a comment and I will try to help.
Auto Generate Service

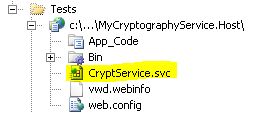
Now, if you go back to your Solution Explorer and navigate to the Tests folder and look inside the MyCryptographyService.Hosts project, you will see the CryptService.svc file.
CryptService.svc

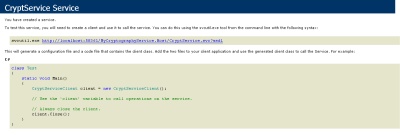
This is the “page” that people will connect to. In fact, if you right click on it and choose “View in Browser” you should see the page below.
CryptService Page in Browser

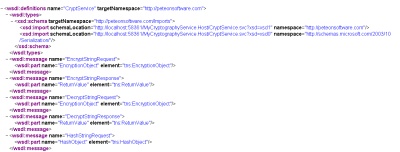
If you click the link that is provided on that page, you can see the WSDL from the service itself.
CryptService WSDL

That’s it. Your WCF service is now fully functional. In the final piece of the tutorial, we’ll make a C# Console Application that calls our service and gives us back some results.

Code Tips

Web Services Software Factory (3 of 5)

If you missed the beginning of the series, you should check out Part 1 and Part 2 before beginning this part if you want to follow along.

Today’s tutorial will create the service contracts for our WCF service and actually implement the methods (read: write some code that does something).

First, in your Solution Explorer, right click on MyCryptographyService.model and Add–>New Model.
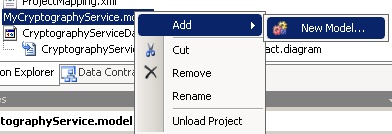
Right Click Add New Model.

You will need to fill out the form like you see below.
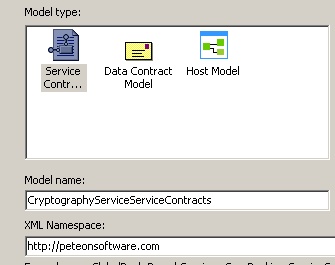
Create New Service Contract Model

If you don’t already have your property window handy, right click in the white designer surface and click properties. Just like with our Data Contracts, select our Project Mapping Table and choose WCF Extension from the “Implementation Technology” dropdown. Set the “Serializer Type” to DataContractSerializer.
Service Contract Model Properties

Since you should be familiar with how the designer surface works (from part 2 of the tutorial), I’m going to move through this part a little more quickly. The toolbox is context sensitive and now displays tools relevant to Service Contracts.
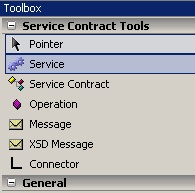
Service Contract Toolbox Context

Drag a Service (name: CryptService), a Service Contract (name: CryptService), an Operation (name: EncryptString), and two messages (EncryptStringRequest and EncryptStringResponse) out onto the designer surface. Arrange and them as shown below.
EncryptString Model

Use the connector tool to connect the objects. Drag a connection between the Service Contract and the Service. Drag another connection between the Operation and the Service Contract. This part is a little bit tricky. You need to associate the “Request” and “Reponse” messages to the operation. However, up to this point, which direction you connected the object did not matter. For the messages, it does. Start on the “Request” message and drag to the Operation. Then for the other connection, start on the Operation and drag it to the “Response” message. You have now finished modeling this Operation.
EncryptString Model Complete

You should drag 2 more Operations onto the surface and call them DecryptString and HashString. Drag 4 more Messages onto the surface and call them DecryptStringRequest, DecryptStringResponse, HashStringRequest, and HashStringResponse. Connect them up like you did for the EncryptString (attaching the Operations to the Service Contract).
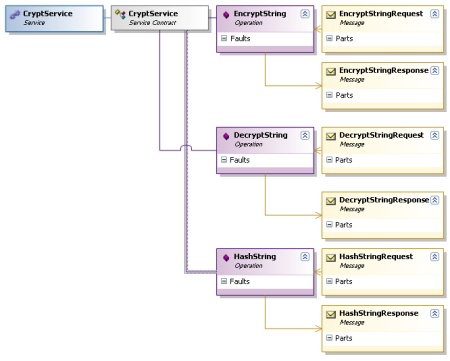
Service Model Sans Payload

Now you are almost done. You need need to load up the messages with their payloads. Right click on EncryptStringRequest and Add–>Data Contract Message Part. Name it EncryptionObject. While it is highlighted, examine the Properties Panel. Next to Type, click the Elipses (…) to bring up this dialog box. Choose EncryptionObject from the box and click OK.
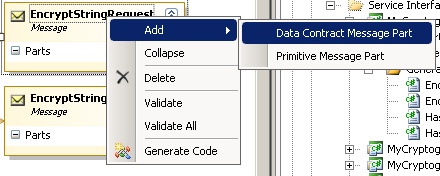
Add Encryption Object to EncryptStringRequest
Add EncryptionObject Type

You should also add an EncryptionObject to DecryptStringRequest and a HashObject to HashStringRequest. Add Primitive Message Parts to each of the three responses and call each one “ReturnValue”. (I realize I haven’t come with the most “enterprisey” names during this tutorial… I’m sorry).
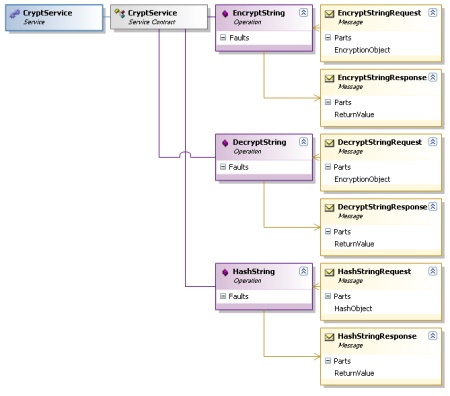
Completed Service Contract Model

Now, right click somewhere in the white of the Visual Designer and choose Validate All. If that comes back with errors, recheck your work. If it comes back clean, right click again and choose Generate Code. You will then have additional generated code appear in MyCryptographyService.ServiceImplementation and MyCryptographyService.ServiceContracts.

Next, right click on the MyCryptographyService.BusinessLogic project and choose to add a new class. Call it CryptographyServiceBusinessLogic. To save some time (and since this code isn’t the point of the tutorial), I’ve included the code here for you.

using MyCryptographyService.BusinessEntities;
using MyCryptographyService.DataAccess;

namespace MyCryptographyService.BusinessLogic
{
    /// <summary>
    /// This class isn't going to do much in this tutorial. 
    /// However, in here, you could apply business logic to your service, 
    /// and maybe make some decisions about which methods in the Data Access Layer's 
    /// "manager" that you wanted to call. For this example, it is just an 
    /// "enterprisey" pass-through to show the concept.
    /// </summary>
    public class CryptographyServiceBusinessLogic
    {
        private CryptManager manager = new CryptManager();

        public string EncryptString(EncryptionObject encryptionObject)
        {
            return manager.EncryptString(encryptionObject);
        }

        public string DecryptString(EncryptionObject encryptionObject)
        {
            return manager.DecryptString(encryptionObject);
        }

        public string HashString(HashObject hashObject)
        {
            return manager.HashString(hashObject);
        }
    }
}

Next, right click on the MyCryptographyService.DataAccess project and add a new class called CryptographyServiceManager. The code for it is below.

using System;
using System.IO;
using System.Security.Cryptography;
using System.Text;
using MyCryptographyService.BusinessEntities;

namespace MyCryptographyService.DataAccess
{
    /// <summary>
    /// This is the class where all the action happens, and all gathering of external 
    /// resources (DB, XML files, registry, etc) should be done from here.  Ideally, in this 
    /// scenerio, you would store your keys external to the application and the 
    /// transformations would be done here with those keys after they were received.
    /// 
    /// NOTE: These implementations are derivations (or outright copying) from samples 
    /// posted on the internet.  Included are:
    /// 
    /// http://blog.stevex.net/index.php/c-code-snippet-creating-an-md5-hash-string/
    /// http://www.codeproject.com/KB/cs/NET_Encrypt_Decrypt.aspx
    /// http://www.obviex.com/samples/hash.aspx
    /// </summary>
    public class CryptManager
    {
        // Note:  This is not a tutorial on encryption.  Key management 
        // is paramount in good encryption and of course storing your 
        // key in plain text in the code is not a good idea.  This is 
        // merely sample code and should not be considered good 
        // cryptography practice.

        private const string KEY = "$0ftw@r3";
        private const string IV = "@p3t30n&";

        private DESCryptoServiceProvider des = new DESCryptoServiceProvider();

        public CryptManager()
        {
            des.Key = ASCIIEncoding.ASCII.GetBytes(KEY);
            des.IV = ASCIIEncoding.ASCII.GetBytes(IV);
        }

        public string HashString(HashObject hashObject)
        {
            switch (hashObject.HashType)
            {
                case HashType.MD5:
                    return getMd5Sum(hashObject.StringToHash);
                case HashType.SHA256:
                    return getSha256Hash(hashObject.StringToHash);
                default:
                    throw new NotImplementedException("That Hashing Algorithm is not supported");
            }
        }

        public string EncryptString(EncryptionObject encryptionObject)
        {
            string cryptText = string.Empty;

            switch (encryptionObject.EncryptionAlgorithm)
            {
                case EncryptionAlgorithm.DES:
                    cryptText = encryptDes(encryptionObject.Text);
                    break;
                case EncryptionAlgorithm.Rijndael:
                    cryptText = encryptRijndael(encryptionObject.Text);
                    break;
                default:
                    throw new NotImplementedException("You provided an algorithm that is not implemented.");
            }

            return cryptText;
        }

        public string DecryptString(EncryptionObject encryptionObject)
        {
            string plainText = string.Empty;

            switch (encryptionObject.EncryptionAlgorithm)
            {
                case EncryptionAlgorithm.DES:
                    plainText = decryptDes(encryptionObject.Text);
                    break;
                case EncryptionAlgorithm.Rijndael:
                    plainText = decryptRijndael(encryptionObject.Text);
                    break;
                default:
                    throw new NotImplementedException("You provided an algorithm that is not implemented.");
            }

            return plainText;
        }

        private string encryptDes(string plainText)
        {
            MemoryStream memoryStream = new MemoryStream();
            CryptoStream cryptoStream = new CryptoStream(memoryStream, des.CreateEncryptor(), CryptoStreamMode.Write);
            StreamWriter writer = new StreamWriter(cryptoStream);
            writer.Write(plainText);
            writer.Flush();
            cryptoStream.FlushFinalBlock();
            writer.Flush();
            return Convert.ToBase64String(memoryStream.GetBuffer(), 0, (int)memoryStream.Length);

        }

        private string decryptDes(string cryptText)
        {
            MemoryStream memoryStream = new MemoryStream(Convert.FromBase64String(cryptText));
            CryptoStream cryptoStream = new CryptoStream(memoryStream, des.CreateDecryptor(), CryptoStreamMode.Read);
            StreamReader reader = new StreamReader(cryptoStream);
            return reader.ReadToEnd();
        }

        private string encryptRijndael(string plainText)
        {
            RijndaelManaged rijndaelCipher = new RijndaelManaged();

            byte[] plainBytes = Encoding.Unicode.GetBytes(plainText);
            byte[] salt = Encoding.ASCII.GetBytes(KEY.Length.ToString());

            //This class uses an extension of the PBKDF1 algorithm defined in the PKCS#5 v2.0 
            //standard to derive bytes suitable for use as key material from a password. 
            //The standard is documented in IETF RRC 2898.

            PasswordDeriveBytes secretKey = new PasswordDeriveBytes(KEY, salt);
            //Creates a symmetric encryptor object. 
            ICryptoTransform encryptor = rijndaelCipher.CreateEncryptor(secretKey.GetBytes(32), secretKey.GetBytes(16));
            MemoryStream memoryStream = new MemoryStream();
            //Defines a stream that links data streams to cryptographic transformations
            CryptoStream cryptoStream = new CryptoStream(memoryStream, encryptor, CryptoStreamMode.Write);
            cryptoStream.Write(plainBytes, 0, plainBytes.Length);
            //Writes the final state and clears the buffer
            cryptoStream.FlushFinalBlock();
            byte[] cipherBytes = memoryStream.ToArray();
            memoryStream.Close();
            cryptoStream.Close();
            string encryptedData = Convert.ToBase64String(cipherBytes);
            return encryptedData;
        }

        private string decryptRijndael(string cipherText)
        {
            RijndaelManaged rijndaelCipher = new RijndaelManaged();
            byte[] encryptedData = Convert.FromBase64String(cipherText);
            byte[] salt = Encoding.ASCII.GetBytes(KEY.Length.ToString());
            //Making of the key for decryption
            PasswordDeriveBytes secretKey = new PasswordDeriveBytes(KEY, salt);
            //Creates a symmetric Rijndael decryptor object.
            ICryptoTransform decryptor = rijndaelCipher.CreateDecryptor(secretKey.GetBytes(32), secretKey.GetBytes(16));
            MemoryStream memoryStream = new MemoryStream(encryptedData);
            //Defines the cryptographics stream for decryption.THe stream contains decrpted data
            CryptoStream cryptoStream = new CryptoStream(memoryStream, decryptor, CryptoStreamMode.Read);
            byte[] plainText = new byte[encryptedData.Length];
            int decryptedCount = cryptoStream.Read(plainText, 0, plainText.Length);
            memoryStream.Close();
            cryptoStream.Close();
            //Converting to string
            string decryptedData = Encoding.Unicode.GetString(plainText, 0, decryptedCount);
            return decryptedData;
        }

        private string getMd5Sum(string inputText)
        {
            // First we need to convert the string into bytes, which
            // means using a text encoder.
            Encoder encoder = System.Text.Encoding.Unicode.GetEncoder();

            // Create a buffer large enough to hold the string
            byte[] unicodeText = new byte[inputText.Length * 2];
            encoder.GetBytes(inputText.ToCharArray(), 0, inputText.Length, unicodeText, 0, true);

            // Now that we have a byte array we can ask the CSP to hash it
            MD5 md5 = new MD5CryptoServiceProvider();
            byte[] result = md5.ComputeHash(unicodeText);

            // Build the final string by converting each byte
            // into hex and appending it to a StringBuilder
            StringBuilder sb = new StringBuilder();
            for (int i = 0; i < result.Length; i++)
            {
                sb.Append(result[i].ToString("X2"));
            }

            // And return it
            return sb.ToString();
        }

        private string getSha256Hash(string plainText)
        {
            byte[] plainTextBytes = Encoding.UTF8.GetBytes(plainText);
            byte[] saltBytes = Encoding.UTF8.GetBytes(IV);

            byte[] plainTextWithSaltBytes =
                    new byte[plainTextBytes.Length + saltBytes.Length];

            for (int i = 0; i < plainTextBytes.Length; i++)
                plainTextWithSaltBytes[i] = plainTextBytes[i];

            for (int i = 0; i < saltBytes.Length; i++)
                plainTextWithSaltBytes[plainTextBytes.Length + i] = saltBytes[i];

            HashAlgorithm hash = new SHA256Managed();

            byte[] hashBytes = hash.ComputeHash(plainTextWithSaltBytes);

            byte[] hashWithSaltBytes = new byte[hashBytes.Length +
                                                saltBytes.Length];
            for (int i = 0; i < hashBytes.Length; i++)
                hashWithSaltBytes[i] = hashBytes[i];

            for (int i = 0; i < saltBytes.Length; i++)
                hashWithSaltBytes[hashBytes.Length + i] = saltBytes[i];

            string hashValue = Convert.ToBase64String(hashWithSaltBytes);

            return hashValue;

        }
    }    
}

Lastly, we only need to do one more thing before this step of the tutorial is complete. We need to implement the methods that tie into what will be our endpoints. When we defined our service contracts, we defined some methods. We need to write the implementation of those methods that tie them to our business layer (and ultimately to our data access layer).

However, since the generated code can and will change every time we make any changes to the service contract designer, we have to create another code file and create a partial class with the same name as the generated one. Inside, we will override the methods, write our own implementation, assign values to the response, and return it. Create a class in the MyCryptographyService.ServiceImplementation project called CryptImplementation.cs. Then you should have the following code inside.

using MyCryptographyService.BusinessLogic;
using MyCryptographyService.MessageContracts;

namespace MyCryptographyService.ServiceImplementation
{
    public partial class CryptService : CryptServiceBase
    {
        protected CryptographyServiceBusinessLogic businessLogic = new CryptographyServiceBusinessLogic();

        public override EncryptStringResponse EncryptString(EncryptStringRequest request)
        {
            EncryptStringResponse response = new EncryptStringResponse();

            response.ReturnValue = businessLogic.EncryptString(
                EncryptionObjectTranslator.TranslateEncryptionObjectToEncryptionObject(request.EncryptionObject));

            return response;
        }

        public override DecryptStringResponse DecryptString(DecryptStringRequest request)
        {
            DecryptStringResponse response = new DecryptStringResponse();

            response.ReturnValue = businessLogic.DecryptString(
                EncryptionObjectTranslator.TranslateEncryptionObjectToEncryptionObject(request.EncryptionObject));

            return response;
        }

        public override HashStringResponse HashString(HashStringRequest request)
        {
            HashStringResponse response = new HashStringResponse();

            response.ReturnValue = businessLogic.HashString(
                HashObjectTranslator.TranslateHashObjectToHashObject(request.HashObject));

            return response;
        }
    }
}

Notice that this is the class that also uses the translators that you wrote. They allow the class that is the DataContract to be mapped to the class that is the BusinessEntity. The code here should be pretty straightforward, but if you have any questions, please leave them in the comments and I will respond as quickly as possible.

Part 4 should be coming shortly. Until then.

Code Tips

Anonymous Types in C# 3.0

For a long time, the var keyword has been the domain of only wholly dynamically typed languages. In fact, some people from the strongly-typed camp have considered the use of var as “hacky”, even though C#-ians have been able to treat everything as an object all along. Granted, it is not exactly the same and there is the whole boxing and unboxing thing to deal with, but I wanted to include full disclosure.

Now however, dynamic languages are all the rage and people are finding good uses for a generic variable type. To harness that power, one of the things done in C# 3.0 was the creation of Anonymous Types. Examine the code below and its output.

var blogPost = new
{
    Name = "Anonymous Types in C# 3.0",
    Author = "Pete Shearer",
    Category = "Code Tips"
}; 

Console.WriteLine(blogPost.Name);
Console.WriteLine(blogPost.Author);
Console.WriteLine(blogPost.Category);

Anonymous Types Output

By declaring my variable blogPost with the var keyword, I have created a dynamic variable. Now, after the new keyword and inside the curly braces, I declare a few properties and set their values. Behind the scenes, the compiler has declared a new object, given it a temporary name, and set the values in “traditional” fashion. It is even smart enough that if I declared another var with that definition, it wouldn’t redefine the anonymous type.

Within the anonymous type, the object remains strongly typed. Consider the following alteration to the code:

var blogPost = new
{
    Name = "Anonymous Types in C# 3.0",
    Author = "Pete Shearer",
    Category = "Code Tips",
    Date = new DateTime(2008, 3, 27)
}; 

Console.WriteLine(blogPost.Date.GetType());

Anonymous Types Output 2

The compiler inferred the type from the object placed into it. I know that I said new DateTime there, but it would have worked for any type that I put into that property. This new feature certainly affords developers a new level of flexibility. Enjoy.