Tag: NUnit

Code Tips

TDD with NUnit

If you haven’t read my first NUnit post and aren’t familiar with NUnit or TDD, you might want to check it out here.

Last time we just looked at the basic ways that you make tests and use the test runner to verify their results. In this post, I’d like to examine how you might go about doing true “Red. Green. Refactor.” Test Driven Development (TDD).

First, I’d like to make a new C# Class Library Application named MathHelper. Rename Class1.cs to MathClass. Additionally, immediately add another project to the solution. Right click on the solution, Add-> New Project. Choose a Class Library Project and call it MathHelperTest. Rename Class1.cs to Tests.cs. Add a reference to the nunit.framework dll and the output from our MathHelper project. Your Solution Explorer should now look like this.
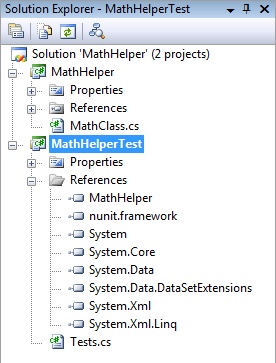
The initial Solution Explorer.

Now, we do need to have something so that the test class will compile and we do have a general idea of what we need from requirements gathering, so put the following code in the MathClass.cs file inside the MathHelper project.

using System;

namespace MathHelper
{
    public class MathClass
    {
        public static double Add(double p1, double p2)
        {
            throw new NotImplementedException();
        }

        public static double Subtract(double p1, double p2)
        {
            throw new NotImplementedException();
        }

        public static double RaiseToPower(double baseNumber, double exponent)
        {
            throw new NotImplementedException();
        }

        public static double Factorial(int number)
        {
            throw new NotImplementedException();
        }
    }
}

What you can see is that I’ve stubbed in the methods that I expect my class to contain. What I’ve also done is make sure they all throw NotImplementedExceptions when they are called, since I’m not writing any functional code until after I write my tests.

So, lets write some tests already! In Tests.cs inside of our MathHelperTest project, enter the following code.

using NUnit.Framework;
using MathHelper;

namespace MathHelperTest
{
    [TestFixture]
    public class Tests
    {
        [Test]
        public void TestStandardAdd()
        {
            Assert.AreEqual(77, MathClass.Add(42, 35));
        }

        [Test]
        public void TestStandardSubtract()
        {
            Assert.AreEqual(31, MathClass.Subtract(77, 46));
        }

        [Test]
        public void TestStandardSquareExponent()
        {
            Assert.AreEqual(25, MathClass.RaiseToPower(5, 2));
        }

        [Test]
        public void TestStandardFactorial()
        {
            Assert.AreEqual(120, MathClass.Factorial(5));
        }
    }
}

Okay, for the sake of simplicity, lets fire up our NUnit GUI and load the MathHelperTest.dll and run our test suite. (If you are unsure how to do this, please refer to my initial NUnit post). It should come as no surprise that all four of our tests failed with Not Implemented failures. Now, lets go back and add some code to make the tests pass.

Change the code in MathClass.cs to this:

using System;

namespace MathHelper
{
    public class MathClass
    {
        public static double Add(double p1, double p2)
        {
            return p1 + p2;
        }

        public static double Subtract(double p1, double p2)
        {
            return p1 - p2;
        }

        public static double RaiseToPower(double baseNumber, double exponent)
        {
            double answer = 1;

            for (int i = 0; i < exponent; i++)
            {
                answer = answer * baseNumber;
            }

            return answer;
        }

        public static double Factorial(int number)
        {
            double answer = 1;

            for (int i = 1; i <= number; i++)
            {
                answer = answer * i;
            }

            return answer;
        }
    }
}

Run the tests again and they should all 4 pass. Woohoo, we’re done, right? Well, not exactly. First of all, our test coverage met the minimum requirements, but didn’t really test the code very well. Secondly, our Math implementation isn’t very great. Let’s solve the first problem first and add some more tests.

using NUnit.Framework;
using MathHelper;
using System;

namespace MathHelperTest
{
    [TestFixture]
    public class Tests
    {
        [Test]
        [Category("Add Method")]
        public void TestStandardAdd()
        {
            Assert.AreEqual(77, MathClass.Add(42, 35));
        }

        [Test]
        [Category("Subtract Method")]
        public void TestStandardSubtract()
        {
            Assert.AreEqual(31, MathClass.Subtract(77, 46));
        }

        [Test]
        [Category("Exponent Method")]
        public void TestStandardSquareExponent()
        {
            Assert.AreEqual(25, MathClass.RaiseToPower(5, 2));
        }

        [Test]
        [Category("Factorial Method")]
        public void TestStandardFactorial()
        {
            Assert.AreEqual(120, MathClass.Factorial(5));
        }

        [Test]
        [Category("Add Method")]
        public void TestNegativeAdd()
        {
            Assert.AreEqual(500, MathClass.Add(700, -200));
        }

        [Test]
        [Category("Subtract Method")]
        public void TestNegativeSubtract()
        {
            Assert.AreEqual(90, MathClass.Subtract(45, -45));
        }

        [Test]
        [Category("Exponent Method")]
        public void TestNegativeExponent()
        {
            Assert.AreEqual(.25, MathClass.RaiseToPower(2, -2));
        }

        [Test]
        [Category("Exponent Method")]
        public void TestDecimalExponent()
        {
            Assert.AreEqual(5, MathClass.RaiseToPower(25, .5));
        }

    }
}

When we rerun our tests in the NUnit Test Runner, we now see that two of them fail (TestDecimalExponent and TestNegativeExponent). Lets see if we can fix our code. MathClass.cs should now look like this.

using System;

namespace MathHelper
{
    public class MathClass
    {
        public static double Add(double p1, double p2)
        {
            return p1 + p2;
        }

        public static double Subtract(double p1, double p2)
        {
            return p1 - p2;
        }

        public static double RaiseToPower(double baseNumber, double exponent)
        {
            return Math.Pow(baseNumber, exponent);
        }

        public static double Factorial(int number)
        {
            double answer = 1;

            for (int i = 1; i <= number; i++)
            {
                answer = answer * i;
            }

            return answer;
        }
    }
}

Okay, all tests pass. Now, lets see if we can do the Factorial method a little better and use a little recursion. We can safely experiment, because we know that our unit test will ensure that it still returns the correct value.

        public static double Factorial(int number)
        {
            // Lets do this recursively.
            double answer;

            if (number.Equals(1)) return 1;
            answer = Factorial(number - 1) * number;
            return answer;
        }

Run the tests and we’re still green, so we’re good. You would continue to go on in this manner. Add additional tests first to test functionality, then code the functionality, then refactor your code to make it efficient, extensible, and maintainable and run your tests again until all is green.

I understand that we could take this sample code further, write more tests, and create better code, but that is always the trade-off. You have to take into account where your code will be used, how mission critical your app is, and decide what level of risk your code can have due to anything less than 100% brilliant testing with 100% code coverage.

Code Tips

NUnit

NUnit. Chances are that you know what NUnit and Test Driven Development are, but if you don’t I’ll give you a quick primer. Test Driven Development means that you drive your development from tests. I know I just reversed the order of the words, but lets take a look at what that means 😉 Test Driven Development has a little motto that goes, “Red. Green. Refactor”.
Red. Green. Refactor.

The red refers to writing the tests for what you want your code to do before you write the code to do it. When a test fails in NUnit (and other Testing Frameworks), they show up as red. Next, you write the actual functional code to make the test pass (green), and then you refactor the code so it is as clean, extendable, testable, and maintainable as possible. Then you run the tests again to make sure that none fail. If they do, you fix your code so that the tests can pass again. You repeat this process as much as is prudent for the project that you are on.

The extra added benefit is that you can feel safe in making changes to your code later. If you have written sufficient test coverage, you can run your tests and if they all pass, then your changes will cause no problems when you deploy.

Now, on to NUnit. NUnit is the first unit testing framework that I ever heard of or used, so I have a soft spot for it. You can get started by downloading NUnit from their download page here. The easiest way to get going quickly is to pick the download named NUnit-2.4.8-net-2.0.msi and then just run the install wizard.

Once you have everything installed, let’s get started. For a sample, let’s just make a new C# class library project called NUnitExample. Add a reference to nunit.framework.dll that can be found at (if you accepted the defaults on install) at C:\Program Files\NUnit 2.4.8\bin\nunit.framework.dll.

Now, enter the following code into the default Class1.cs file and build the project:

using System;
using NUnit.Framework;

namespace NUnitExample
{
    /// <summary>
    /// [TestFixture] is an attribute that you 
    /// add above any class that you want to 
    /// contain tests.
    /// </summary>
    [TestFixture]
    public class MathTests
    {
        protected int a;
        protected int b;
        protected int c;

        /// <summary>
        /// Any variable setting or state 
        /// setup you need to do can be done
        /// in a method marked with the 
        /// [TestFixtureSetUp] attribute.
        /// </summary>
        [TestFixtureSetUp]
        protected void Setup()
        {
            a = 9;
            b = 2;
            c = 0;
        }

        /// <summary>
        /// You can create tests by applying 
        /// the [Test] attribute to any method 
        /// that is public, takes no params, 
        /// and returns void. If the method 
        /// does not meet these requirements, it 
        /// will be ignored.
        /// </summary>
        [Test]
        public void Adding()
        {
            Assert.AreEqual(11, a + b);
        }

        /// <summary>
        /// This Test will fail. Normally, you test for purposeful failure 
        /// (like a validation error) and that is a "passed test", that 
        /// isn't what I'm doing here.  I'm just showing what a failed test 
        /// looks like in the Test Runner.
        /// </summary>
        [Test]
        public void Dividing()
        {
            Assert.AreEqual(4.5M, a / b);
        }

        [Test]
        public void DivideByZeroException()
        {
            try
            {
                int x = a / c;

                // If we get to this line, throw an 
                // exception because the above division 
                // shouldn't work.
                throw new Exception("Division Worked");
            }
            catch (Exception ex)
            {
                Assert.IsInstanceOfType(typeof(DivideByZeroException), ex);
            }
        }

        [Test]
        public void Comparison()
        {
            Assert.That(a > b);
        }

        /// <summary>
        /// These next 3 tests will be ignored 
        /// because their signatures aren't 
        /// correct.
        /// </summary>
        [Test]
        private void Ignored1()
        {
            Assert.AreEqual(1, 2);
        }

        [Test]
        public string Ignored2()
        {
            Assert.AreEqual(1, 2);
            return string.Empty;
        }

        [Test]
        public void Ignored3(int a, int b)
        {
            Assert.AreEqual(1, 2);
        }
    }
}

Now, fire up the NUnit Test Runner GUI. It is located at C:\Program Files\NUnit 2.4.8\bin\nunit.exe. When it opens, click File –> Open Project and then navigate to the .dll that was created from the project that you built and click “Open”.

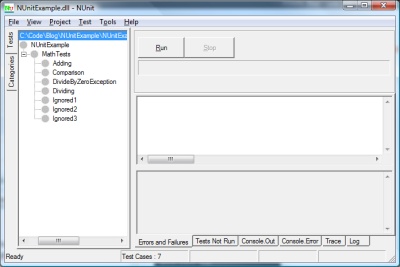
The NUnit GUI should now look like this:
NUnit Ready to Run Tests

Make sure you have the top level highlighted and click Run. It will look like this:
NUnit After Initial Tests

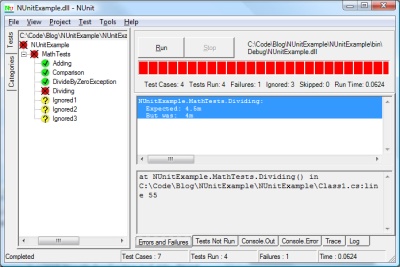
What you see is that the entire test fixture of NUnitExample has failed (the red circle with the X). Parent levels are always shown as having the same success level as the lowest success level below it. You see that Adding, Comparison, and DivideByZeroException passed. No surprise here. Additionally, the three tests named ignored have been ignored because their signatures were incorrect. If you click the “Tests Not Run” tab at the bottom of the runner, you can see why.
Reasons for ignored tests

If you click the “Errors and Failures” tab, you will see why the Dividing Test failed.

NUnitExample.MathTests.Dividing:
  Expected: 4.5m
  But was:  4m

Oh, yeah. Integers only hold whole numbers. Lets go back and change the code. (Normally, you’d change your code, but here the “active” code is embedded in the tests because of this simple sample.) Change the Dividing test to the following:

public void Dividing()
{
    Assert.AreEqual(4.5M, Convert.ToDecimal(a) / b);
}

When you switch back to the NUnit Test Runner, it will have automatically refreshed because the test project has changed. Run it again and the Dividing test will pass and the overall status will be yellow because the lowest level of success in the child tests was also yellow.

If you instead would like to use the command line for NUnit (perhaps for continuous integration or just as part of your build task on your program) you can do that as well. Open a command window and enter the following command: (If you changed anything on NUnit install, change “c:\Program Files\NUnit 2.4.8\bin” to match your install path. The argument passed in is the path to the .dll of the project that you created.)

"c:\Program Files\NUnit 2.4.8\bin\nunit-console" c:\code\blog\NUnitExample\NUnitExample\bin\Debug\NUnitExample.dll

When you run it, you get the following results:

c:\Program Files>"C:\Program Files\NUnit 2.4.8\bin\nunit-console" C:\Code\Blog\NUnitExample\NUnitExample\bin\Debug\NUnitExample.dll
NUnit version 2.4.8
Copyright (C) 2002-2007 Charlie Poole.
Copyright (C) 2002-2004 James W. Newkirk, Michael C. Two, Alexei A. Vorontsov.
Copyright (C) 2000-2002 Philip Craig.
All Rights Reserved.

Runtime Environment -
   OS Version: Microsoft Windows NT 6.0.6001 Service Pack 1
  CLR Version: 2.0.50727.1434 ( Net 2.0.50727.1434 )

.....N.N.N
Tests run: 4, Failures: 0, Not run: 3, Time: 0.031 seconds

Tests not run:
1) NUnitExample.MathTests.Ignored1 : Method Ignored1's signature is not correct:
 it must be a public method.
2) NUnitExample.MathTests.Ignored2 : Method Ignored2's signature is not correct:
 it must return void.
3) NUnitExample.MathTests.Ignored3 : Method Ignored3's signature is not correct:
 it must not have parameters.

In a later post, I will look at doing Test First development with a true “Red. Green. Refactor.” feel.